Our Tips to Take Better Blog Photos
Disclaimer: We knew N-O-T-H-I-N-G about photography or cameras before we started blogging, emphasis on the nothing. We still have so much to learn, but one baby step at a time, we continue to learn and practice and really enjoy the journey. If you walk away with nothing else from today’s post, we hope you remember that if WE can do it… so can you!

The Right Supplies
Like most hobbies, you must have the right equipment for the job. When we first started blogging, we both just used point & shoot cameras. If you’ve ever scrolled through our archives, you can see some of those cringe-worthy photos (we’ll save you the time..they’re bad. Don’t go look). Eventually (when we realized this blogging thing was here to stay), we both invested in DSLR cameras.
[Side Note: You’ll notice we use both Nikon & Canon. We think both are awesome options, but we do wish that we would have chosen 1 brand and stuck with it. Now we have double the accessories because things aren’t compatible with each brand. So if you’re a blogging duo…we suggest staying true to one brand from the start. Just our 2 cents though]

Our Cameras
- Nikon D3100: This is the camera Casey uses. It’s been a great beginner camera, but she is ready for an upgrade! #byebyeNikon
- Canon Rebel T3i: This was Bridget’s intro camera. Again, another great beginner camera and an awesome Canon option.
- Canon EOS 7D: This is currently Bridget’s new camera and it is amazing! So many awesome capabilities with this thing (including video!). Casey’s eventually gonna take the plunge and purchase this bad boy too.
- 50mm Lens: We love these for close-up photography.
We also (wrongly) assumed that we only needed nice cameras to attain awesome photos. In reality, it’s the accessories that really help take things to the next level.

Basic Accessories
- Tripod: Unless we’re shooting outside on a bright day, 99.9% of the time we’re using a tripod to shoot our photos. Tripods are a must because they keep the camera stable when shooting. Even if you hold really steady while taking a photograph, your body is moving a bit. Moving = less crisp photos. Plus, using a tripod is the only way you can take photos in low-light situations when you want to achieve a bright & airy shot. <–which is pretty much always our gameplan.
- 50 mm lens (Casey’s Nikon 50mm & Bridget’s Canon 50mm): This past year we both added 50mm lenses to our equipment stash. Honestly, we didn’t know much about them, but figured it was an inexpensive way to upgrade from the lenses that came with our cameras. Wow, oh wow! They’re both amazing (although Bridget’s is a bit better because it has auto-focus). This lens allows you to take amazing close-up shots…you know the ones where the object is in focus and the rest of the background is blurry. This lens is amazing for that. Almost all of our close-up shots use this lens. We often switch back & forth between our basic lens & the 50mm lens when doing a photo shoot. The only bad things about these lenses is that you cannot zoom. But if you’re looking for another lens to add to your collection…get one of these!
- Light Kit: We’ll get into more detail about lighting later on in this post, but this was another gamechanger when it came improving our blog pics.
- Reflector: A reflector is a great tool in many situations. Outside, we’ll often use the silver reflector to add some light to an object or someone’s face. Indoors, the white reflector acts as a great blocker to diffuse shadows. If the sun is streaming in a bit too much through the window, we’ll block it with a reflector to achieve more even light.
- White Foam Board & “Marble” Backdrop: We use either a white foam board or marble contact paper that is stuck to white foam board for many of our “crafts” or simple shots. Having a muted background allows the object itself to get the attention and not the busy background. We bought a roll of marble contact paper from Amazon and that was enough to make foam boards for every blogger in Chicago. So… much… paper. Hence, why we used it to hack this IKEA shelf.


Extra Accessories
- Remote Control Shutter Release: This is our “secret photographer” when we both need to be in a shot. Our husbands have officially been replaced with a remote control…and we haven’t looked back! In honor of full disclosure, we’ll admit that our Christmas Card was actually shot using this remote control.
- Boom Mic: We use this on Bridget’s Canon EOS 70D for crisper audio on our videos.
- Go Pro Hero3: This is a new addition to our photography equipment and we are obsessed with it. Expect to see some GoPro footage soon in some upcoming videos.
- Camera Bags: We are obsessed with our JoTote bags.
Don’t Be Afraid of Manual
We’ve said it before, but before becoming bloggers we were both under the assumption that a fancy camera = amazing, jawdropping pictures. Boy oh boy, that is certainly not the case. Yes, a nice camera can take awesome pictures…but if you’re not using it to its full potential then your pics won’t compare to the magazine-worthy ones you often see online. At the start we both used our cameras in the “auto” setting, but we eventually learned not to fear the “M”….MANUAL! <– game-changer
Yes the thought of going into full manual mode on your camera is scary, but it’s also the best way to achieve better pictures. We both took Photography 101 from Shoot Fly Shoot and it helped us understand what the heck aperture, ISO, and shutter speed meant. The online course walks you through all of those scary terms and in the end you’ll be much more familiar with your camera.
But (class or not) the only way to truly get better at photography is to practice shooting in manual constantly. Practice in all different settings….outside, in low light situations, in rooms with fluorescent lights…until you feel much more comfortable with that big ol’ “M.” We both have a lot to learn when it comes to photography (like lots & lots), but we do know that we get better every time we pick up our cameras, which motivates us to continue to want to practice!
Lighting
We’re guessing you’ve probably heard this before, but lighting is key when it comes to capturing good photos. 100% of our photos are taken during the daytime, and most often we try to shoot near windows. Light is best in the morning & near sunset, but honestly we both take photos whenever there is daylight. Even if you’re not a blogger, this tip can help. If you’re taking pictures of your home for real estate purposes (or even just to post on Facebook for fun!), make sure you shoot them during the day.

This picture…
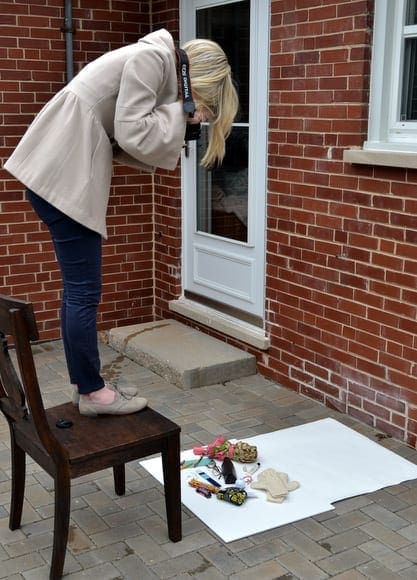
.. was actually taken outside because of the great natural light that day, even when it was FREEZING!

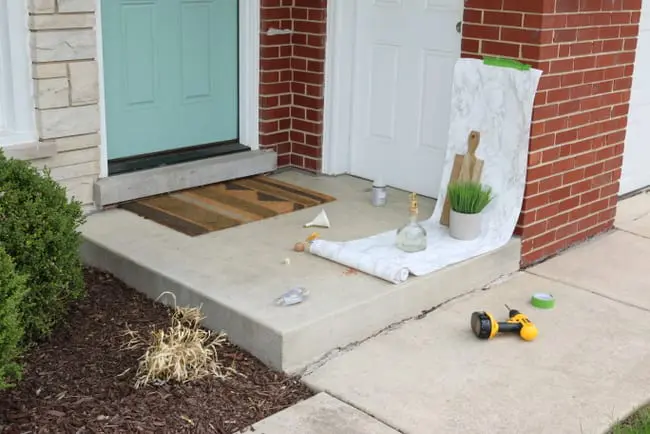
And this picture…… actually looks more like this:Glamorous, right? (PS. Dead plant photo bomb!)
If it’s a gloomy day or we’re shooting an interior room with no windows, that’s when our light kit comes in handy (and our tripods). We both have the light kits listed in the supplies above, and our lights are a lifesaver! They make our spaces look less “yellowy” and illuminate corners in rooms that otherwise would be too dark to shoot. If you’re a blogger who shoots indoors, spend the $60 and get one of these kits. #moneywellspent

Random Lighting Tips
- When shooting outdoors, cloudy days are our favorite! Clouds = no harsh shadows or sun streaks, and more even lighting.
- Snowy Days (like really snowy!) are also great for bright interior photos.
- We turn off all of the lights in our rooms when taking photos. Even if it’s in the room next door, best to just turn all lights off.
- Open up your curtains, your blinds, and even doors to let the most daylight into your home.

We were never as dependent on the sun rising and the sun setting until we started taking photos for the blog. Let’s just say that we’re big fans of long days & late sunsets because it means there’s still time to take pictures when we get home from work! And now you can see why our weekends are blog photo marathons… so much light to soak up before the work week hits and our photography time is way more limited.

Holy novel… let’s stop there for now. We’re pretty convinced that if you’re a real photographer tuning in today, you want to pull your hair out right about now. Yes, yes… we know, we know. Total rookies over here. As we continue to navigate the blogging world of all things photography, we’ll try to update you on some behind-the-scenes info. If you have any questions or requests, don’t hesitate to let us know. And more importantly if you have any tips or tricks to share, we’d really LOVE to hear those.
Bridget&Casey