How to Install a Light Fixture (Easy DIY Step-by-Step Guide)
Installing a light fixture might sound intimidating, but it’s a DIY project most homeowners can handle with the right tools and safety steps. This step-by-step guide shows you exactly how to replace a ceiling light fixture.
I’ve swapped out a lot of lighting fixtures around our house, but I realized I never created one dedicated resource that walks through the process from start to finish. And trust me, there was a time when anything involving electrical wires felt totally intimidating to me. I mean… electrical?! Ah, scary.
But after changing out pretty much every light fixture in our home, I’ve learned that this project is far more doable than it seems — even if it turns into a bit of an arm workout when you’re installing a heavy fixture solo.

Today’s post is your go-to reference, covering the supplies, safety tips, and step-by-step process I follow whenever I install a new lighting fixture. And if you’re planning a bigger lighting update, you can also check out my rules for lighting guide to make sure your space feels balanced and well-lit.
That said, every home is different. You never quite know what you’ll find when you remove an old fixture — unexpected wires, outdated parts, or something that turns a “quick” project into a longer learning experience.
As you’ll soon read, I thought this swap would take less than an hour, but it definitely had other plans.
Project at a Glance:
| Difficulty: ⭐️ ⭐️ ⭐️ of 5 | Time: 30-60 minutes |
| Supplies needed: Wire Nuts Electrical Tape New Fixture | Tools needed: Screwdriver and Drill Wire Cutters (or Wire Strippers) Ladder Voltage Tester Head Lamp (optional): I didn’t need this for today’s project, but if you’re tackling a light install without natural light or at nighttime, it comes in handy! |
How to Install a Light Fixture (Quick Overview)
If you’re brand new to electrical DIY, here’s a simple breakdown of the basic steps before we dive into the full tutorial:
- Turn off power at the circuit breaker and confirm with a voltage tester.
- Remove the old fixture and take a photo of the existing ceiling wiring.
- Install the new mounting bracket or mounting bar if needed.
- Connect the electrical wires — black to black (hot), white to white (neutral), and ground wire to the green screw or grounding bar.
- Secure the fixture to the ceiling box and attach the canopy or decorative plate.
- Restore power and test the light switch.
Step-by-Step: Installing a Ceiling Light Fixture
Ready to get started? Below is the full step-by-step process I follow whenever I install a ceiling light fixture at home.
Turn Off the Power

This is the most important step of the entire installation process. Head to your electrical panel and switch off the circuit breaker that controls the light fixture. If you’re not sure which breaker it is, turn the light on first and flip breakers one at a time until the power supply is completely off.
Once the breaker is off, go back to the room and try the light switch to confirm nothing turns on. Then use a voltage tester to check the ceiling wires and inside the electrical box. This extra step helps prevent electrical shock and gives you peace of mind before touching any wiring.
It might feel like overkill, but double-checking your power source is always a good idea when working with electrical wires. Safety first, always!
Take Down the Old Fixture & Snap a Picture

Every lighting fixture is installed a little differently, but most are attached to a mounting plate or ceiling box with a few screws. Start by supporting the old fixture with one hand while you loosen the screws that hold it in place. Once it’s free, gently lower it so you can see the ceiling wires and wire connectors.
Before disconnecting anything, grab your phone and take a clear photo the electrical wires so you can see and remember how they are connected. This quick reference makes it much easier to install your new fixture later, especially if you’re working with multiple sets of wires or an older electrical box.
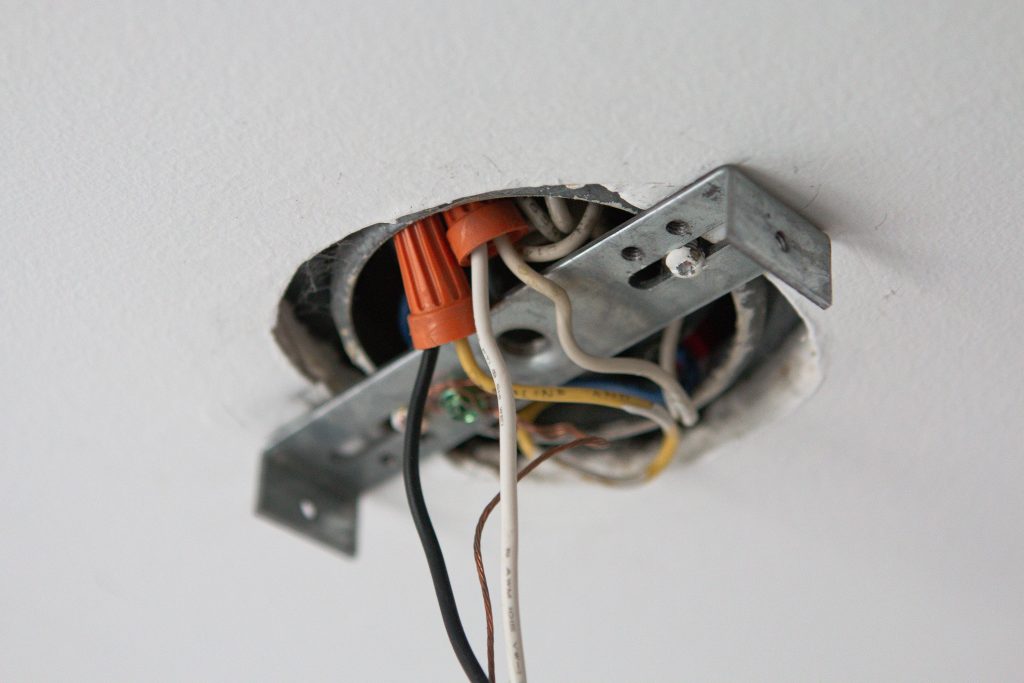
In my case, I had a copper ground wire attached to a grounding screw, white neutral wires connected together, and a black wire tied into the hot wire. Every home is different, though, so don’t worry if your ceiling wiring looks slightly different.
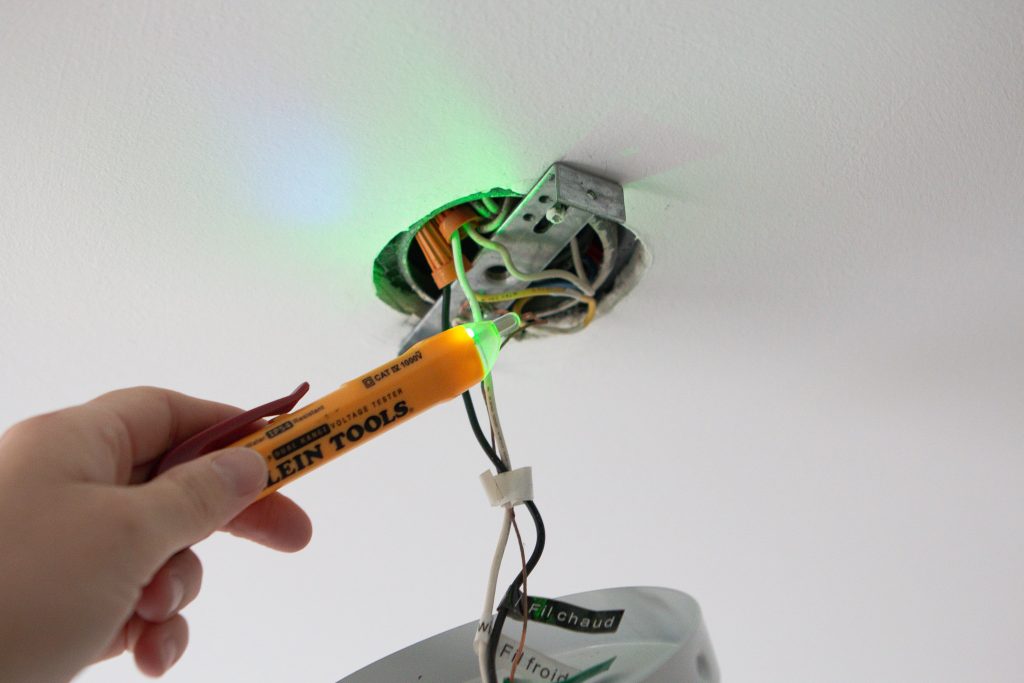
After snapping your photo, use your voltage tester one more time to confirm there’s no power running through the wires.
Then remove the old wire nuts and carefully disconnect the fixture wires from the ceiling wiring. At this point, your old light fixture should be completely free.
Check Out Your New Fixture
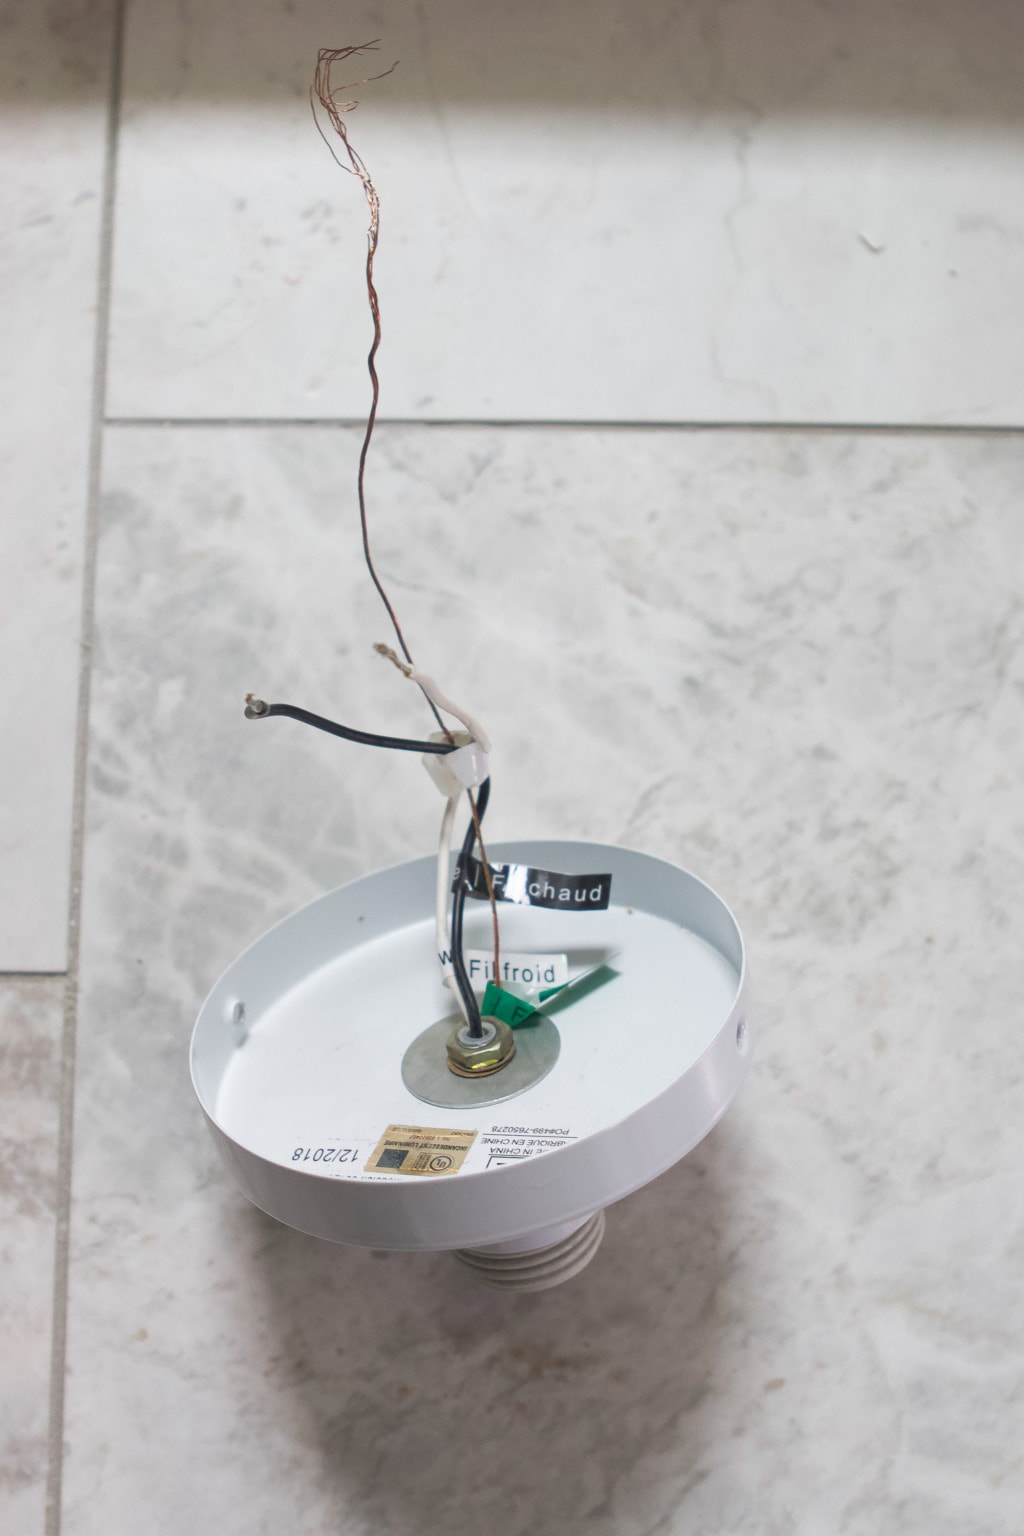
Before climbing the ladder, take a few minutes to look over your new lighting fixture and read through the manufacturer’s instructions. Every fixture is a little different, and understanding how the mounting bracket, canopy piece, and fixture hardware work together will make the installation process much smoother.
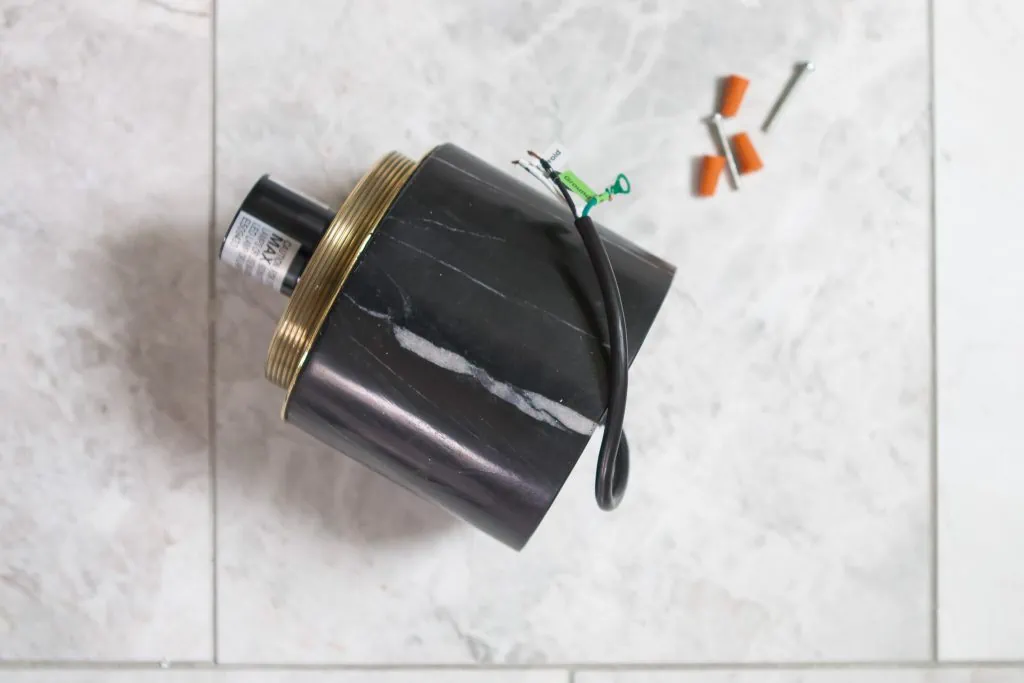
Most light fixtures come with three main wires: a black hot wire, a white neutral wire, and a green or bare copper ground wire. In my case, the fixture had a long cord with all three wires inside, so I needed to prep the ends before connecting them to the ceiling wiring.
To do this, I used wire cutters (or wire strippers) to carefully remove a bit of the protective coating at the end of each wire. You only need about an inch of exposed wire to make secure connections later on.

I also realized that the cord was longer and bulkier than I needed, which made it harder to tuck everything into the ceiling box. Trimming the cord slightly helped reduce the extra bulk and made attaching the fixture much easier.
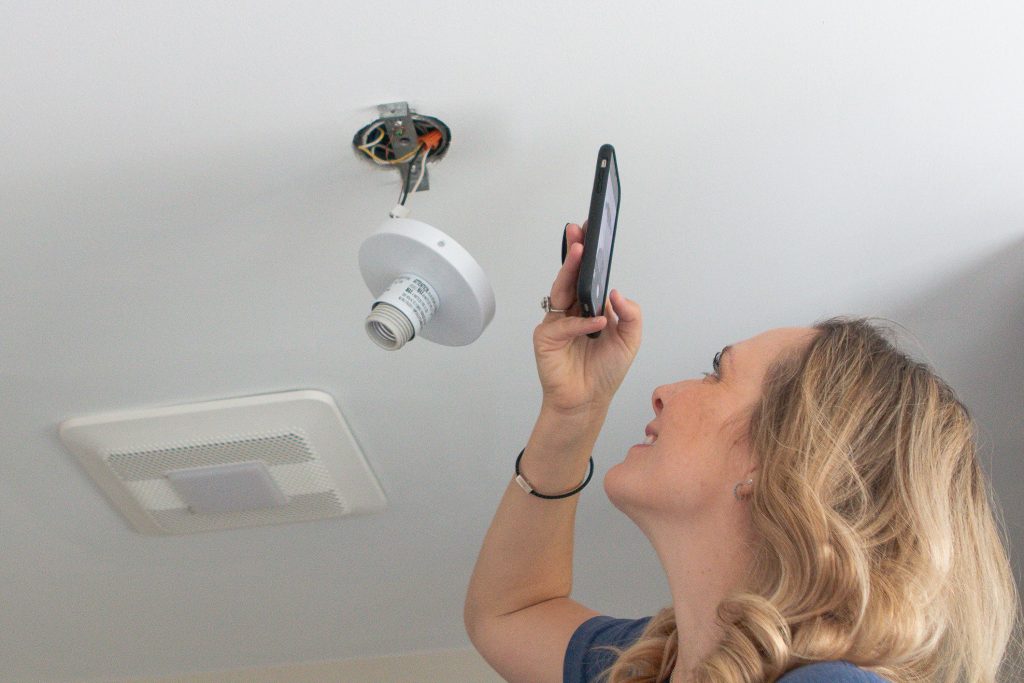
Grab Your Tools & Get Into Position
This is usually the trickiest part of the installation process, especially if you’re working solo. You’ll need to hold the new light fixture while connecting the ceiling wires, which can feel a little awkward. (And yes, it can turn into a serious arm workout if your fixture is heavy!)
If possible, recruit a helper to hold the fixture while you connect the electrical wires. Having an extra set of hands makes it much easier to secure the ground wire, attach wire nuts, and keep everything steady while you work.
Before climbing the ladder, gather all of your tools and supplies so they’re within reach. I like to pre-cut small pieces of electrical tape and set my wire nuts and screwdriver on a ladder tray so I’m not fumbling around, mid-install. And yes… I’ve even tucked wire nuts into my sports bra before so I wouldn’t drop them, You do what you have to do when you’re DIYing solo!
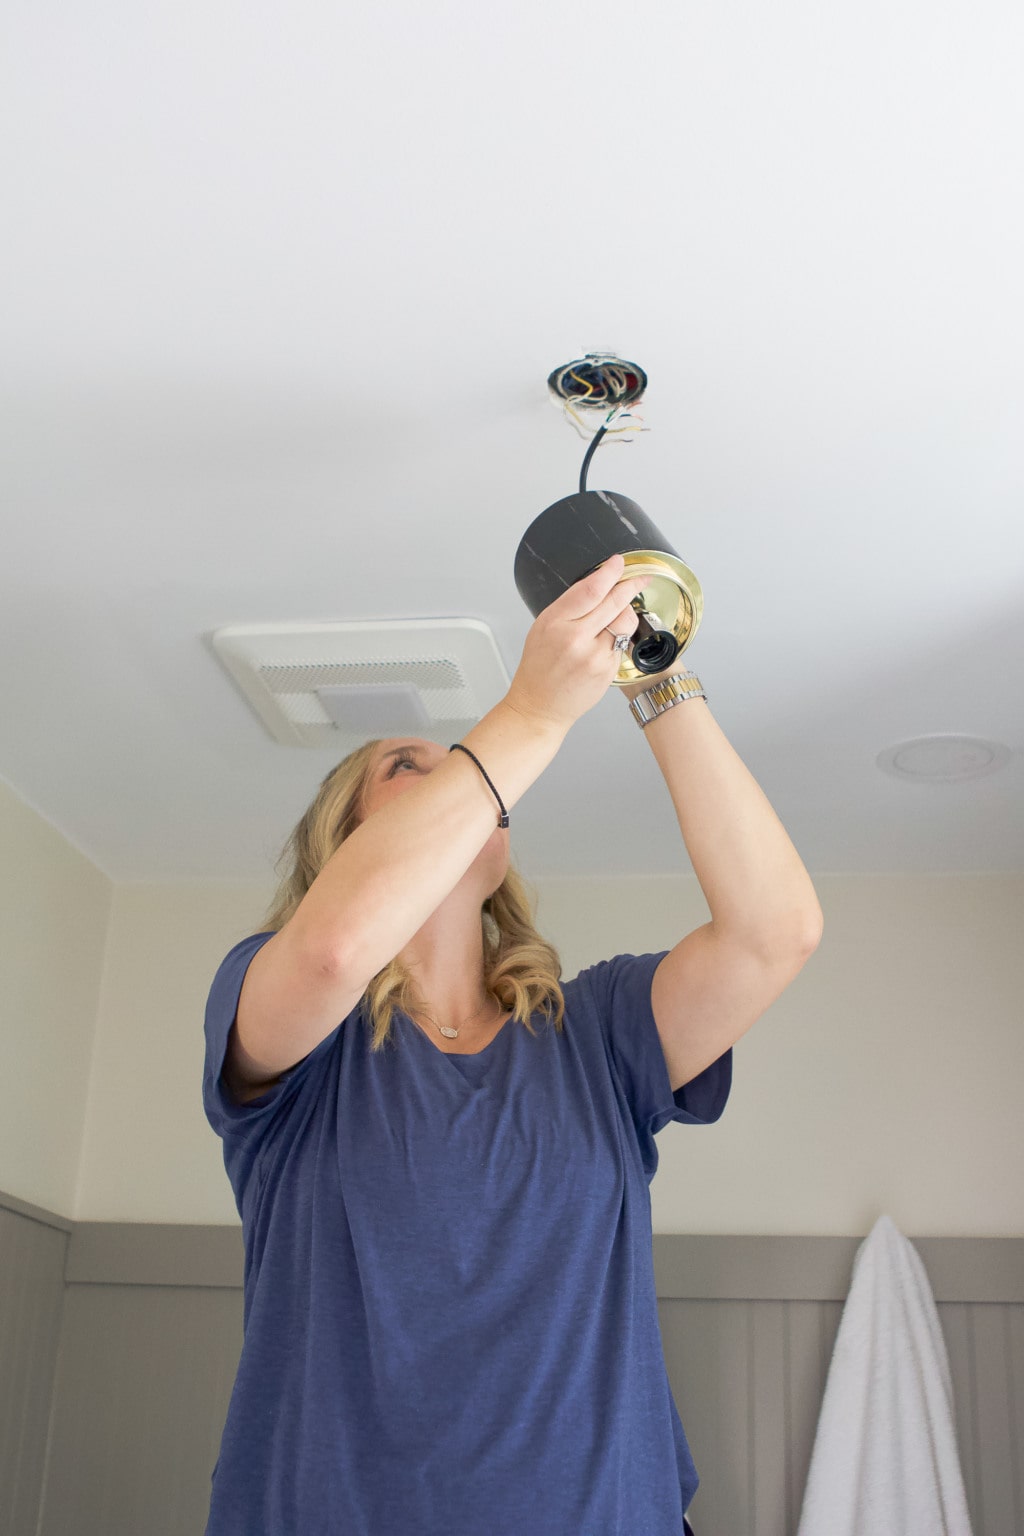
Attach the Mounting Plate
Every light fixture installs a little differently, but most include a new mounting bracket or mounting bar that attaches directly to the ceiling box. This bracket is what supports the weight of the fixture, so take a minute to make sure everything feels secure before moving on.
If you’re installing solo, a helpful trick is to partially secure the mounting plate first, so it catches onto the ceiling fixture box without tightening it completely. That way, you can briefly rest the fixture against the bracket while connecting the wires instead of trying to hold everything up at once.
That’s the approach I used here — mainly because I didn’t have an extra set of hands. And honestly, once you understand how the fixture hardware lines up with the mounting bar, this step becomes much easier.
Connect Your Wires
Now comes the part that feels the most intimidating — connecting the electrical wires . But once you understand what each wire does, it’s actually very straightforward.
Most light fixtures have three main wires:
- Black wire (hot wire)
- White wire (neutral wire)
- Green or bare copper wire (ground wire)
In my setup, I connected the green ground wire to the small green screw on the mounting bracket, joined the white wires together, and connected the black wire to the hot ceiling wire. Your wiring may look slightly different depending on your home, so always follow the manufacturer’s instructions and double-check your reference photo from earlier.
Here are a few simple tips that made this step easier:
- Prep your supplies first. Cut small pieces of electrical tape and keep your wire nuts within reach before climbing the ladder.
- Twist wires tightly before adding a wire nut. A secure connection helps prevent wires from loosening when you attach the fixture.
- Gently tuck the wires back into the ceiling box once everything is connected so they stay out of the way.
Secure the Fixture to the Ceiling

Once your electrical wires are connected and tucked neatly into the ceiling box, it’s time to attach the light fixture itself. Depending on the design, your fixture may screw in from the side, twist onto the mounting bar, or attach using a decorative plate or canopy piece.
This was my first time installing a fixture that twisted onto the mounting bracket from below, and honestly, it was much harder than I expected. I kept attaching the fixture, turning the power back on, and wondering why the light wouldn’t work. Eventually, I realized that twisting the fixture was slightly pulling the wires apart inside the ceiling box. Ugh!
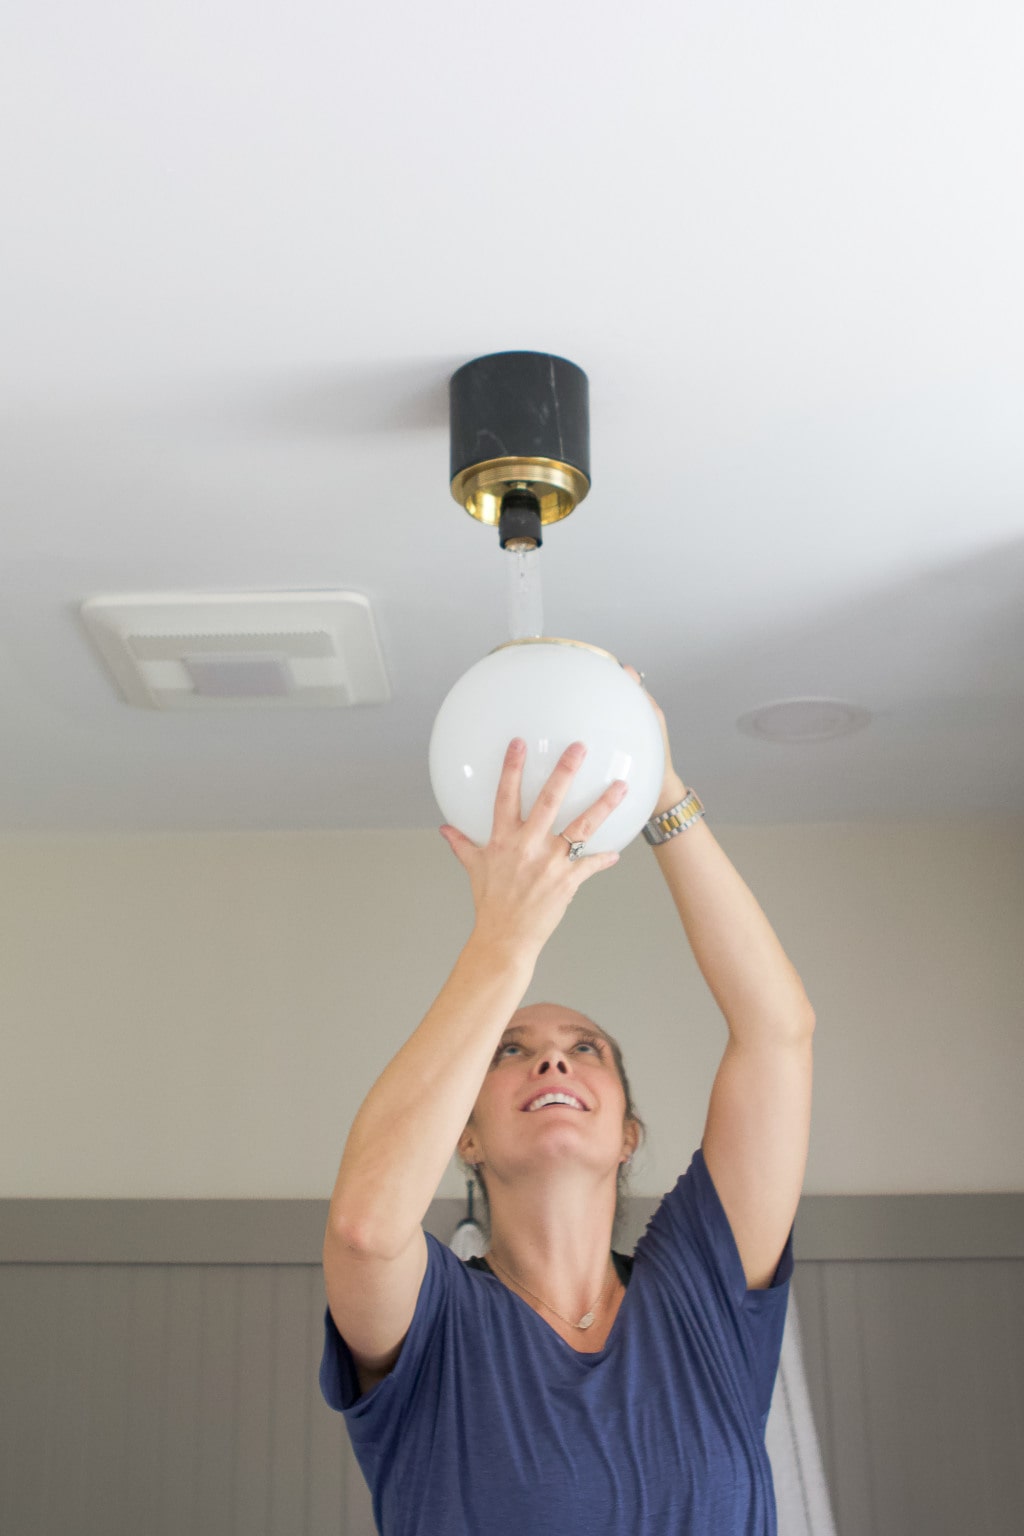
The fix? Making sure the wire connections were extra secure before tightening everything fully into place.
If your fixture feels stubborn, take a minute to double-check that:
- The wire nuts are tightly secured
- The wires are fully tucked into the ceiling fixture box
- The canopy or decorative plate sits flush against the ceiling
Once everything feels secure, install your light bulbs and attach any light covers or detachable parts that came with the fixture hardware.
Turn On the Power & Test Your Light
Once the fixture is fully secured, head back to your electrical panel and flip the circuit breaker back on. Return to the room and test the light switch to make sure everything is working properly.
During this install, I made a few trips up and down the stairs turning the power on and off and I definitely counted it as my workout for the day! If your light doesn’t turn on right away, don’t panic. It usually means a wire connection needs to be tightened or adjusted.
Before troubleshooting, switch the power back off at the breaker so you can safely check your wiring inside the ceiling box.
Touch-Up the Ceiling

After installing a new lighting fixture, I almost always notice a few smudges or marks on the ceiling from handling the fixture and adjusting the mounting bracket. Before calling the project done, grab a little ceiling paint and do a quick touch-up around the canopy or decorative plate so everything looks clean and finished.
It’s a small step, but it makes a big difference!
Frequently Asked Questions About Installing a Light Fixture
Still feeling unsure about tackling this project? Here are a few common questions I hear about installing light fixtures at home.
Can you install a light fixture yourself?
Yes! Many homeowners can handle a basic light fixture swap, especially when you’re working with an existing ceiling box and familiar wire colors. As long as you turn off power at the circuit breaker, use a voltage tester, and follow manufacturer instructions, this can be a very approachable DIY project.
Do I need an electrician to replace a ceiling light fixture?
Sometimes. If you’re moving the location of a light, installing a heavier chandelier that requires a reinforced ceiling box, or dealing with older wiring that looks damaged or unusual, it’s best to call a licensed electrician. When in doubt, safety always comes first.
Which wire connects where on a light fixture?
Most lighting fixtures follow the same basic wiring pattern:
- Black wire → hot wire
- White wire → neutral wire
- Green or bare copper wire → ground wire
Always refer to the manufacturer’s instructions before connecting any electrical wires.
How long does it take to install a light fixture?
Most installs take about 30–60 minutes depending on the weight of the fixture and the condition of your ceiling wiring. Older homes or unexpected electrical parts can sometimes add extra time.
Light Fixtures I Love Right Now
If you’re planning to update your space, here are a few flush-mount and semi-flush styles I recommend. Unfortunately, the one I used here is no longer available, but there are many great options to choose from.

Final Thoughts

Installing a light fixture might feel intimidating at first, but once you understand the basic steps, it becomes a DIY project that gets easier every time you do it.
If this is your first time tackling electrical DIY, start slow, stay safe, and don’t hesitate to call a licensed electrician if something doesn’t look right. There’s no shame in asking for help — but you might be surprised by how doable this project really is!
Casey


