How to Build a Fauxdenza
On Friday, I gave you guys a little sneak peek of our new fauxdenza in the guest room. Today, let’s go into the step-by-step for this DIY project.

When creating a gameplan for this space, I knew that we absolutely needed some sort of hidden storage. But because this space is small (11×11), the storage piece needed to “pack a punch” and fit the space perfectly. That’s when the “fauxdenza” came to mind. I’ve seen many floating credenzas in the blogosphere (like this one & this one), and I figured it just might be a good bet for our guest room space. Many of the ones I saw used Ikea kitchen cabinets, and I liked that option because not only is it economical, but there are also so many cabinet sizes to choose from.
How to Build a Fauxdenza

So it was decided…we would build a fauxdenza for the guest room! After a bit of research, I made the following shopping & supply lists.
Ikea Shopping List
- (6) UTRUSTA hinges
- (2) UTRUSTA Shelf Packs
- 1 SEKTION Suspension Rail
- (6) VEDDINGE Doors (size: 12×30, color: white)
- (3) SEKTION Wall Cabinet Frames (size: 24x30x14.75, color: white)

Supplies
- Minwax Stain (color: Jacobean)
- Plywood (Cut to Size at Lowe’s; I got Birch wood)
- Hack Saw (make sure it’s one that is good for cutting metal)
- Rags
- Saw Horses & Plywood Top (for a little work station in the garage)
- Polycrylic Finish
- Wood Conditioner
- Screws
- Wood Veneer Edging
- Sanding Sponge
- Paint Brush
- Utility Knife
- Wall Cabinet Screws
- Gloves
We first made a trip to Ikea, which is the least fun thing to do on a Saturday morning. Seriously, legit chaos up in there. BUT….I will fill you in on my little secret to get in and out of Ikea in less than 30 minutes <— not an exaggeration.
Make an Ikea shopping list online first, print it out, and bring it with you. Then head right to the kitchen area, find an Ikea employee, and hand them the list. They will order everything for you, you will pay right there (yes, right in the kitchen area! No long line for you), and they will send you to the checkout to pick up your items. It was seriously the easiest Ikea trip I’ve ever done, and Finn was so incredibly thankful that I planned out what we needed ahead of time. Of course, I was a little sad that I couldn’t randomly throw other fun items in our cart, but we were in and out in no time at all.
Steps to Build a Fauxdenza
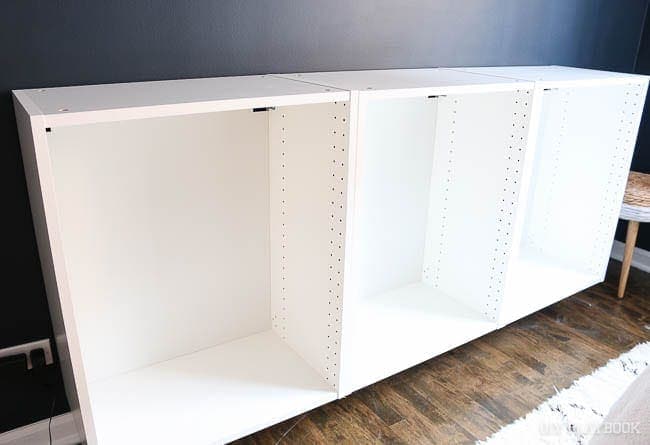
Once we had all of our Ikea products, it was time to put the cabinets together. Luckily, I have a husband who actually doesn’t mind putting together Ikea furniture pieces. (I know…he’s a keeper!) So Finn put all of the cabinet bases together while watching sports one day, while I worked on other parts of the guest room.

With the cabinets done, we needed to cut the Ikea suspension rail to size. It comes at 84 inches…but because our cabinets were only 72 inches across, we needed to cut it down. All it took was a hand saw, and some elbow grease, to get it cut down to the correct size. Hanging the suspension rail was fairly simple too. We just followed the instructions that came with it and drilled directly into the studs using screws made specifically for wall cabinets.
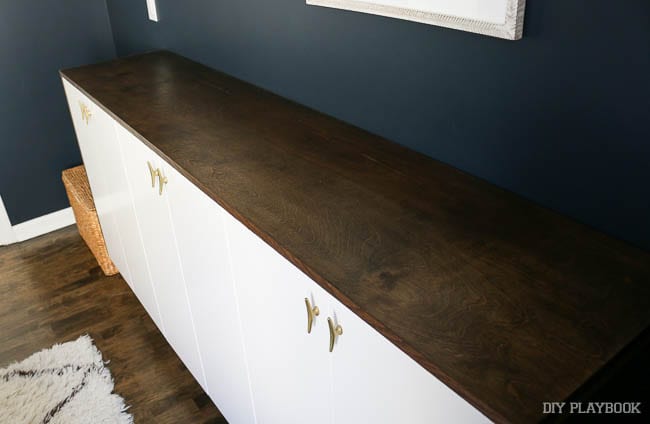
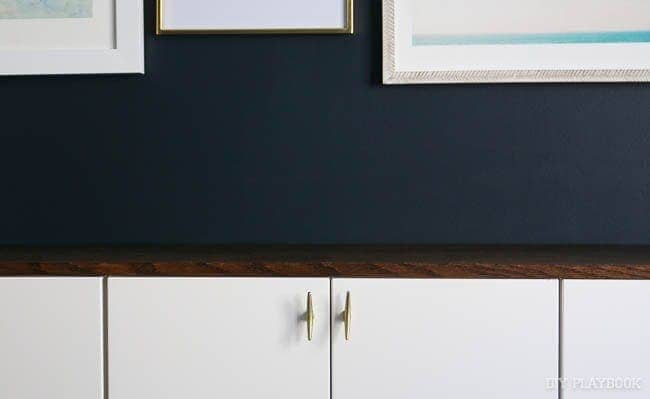
Then, you just slide the cabinets right on top of the rail. The cabinet bases were up, but it left much to be desired. Since these are technically kitchen cabinets, they tops are not finished. So we knew we would have to cover the top and sides with a beautiful piece of wood.
Here’s the hard part. You can’t just go to the hardware store and pick up some gorgeous lumber, because most lumber isn’t wide enough to cover the depth of the cabinets. So you either need to find a specialty piece of wood ($$$), or get creative as we did.
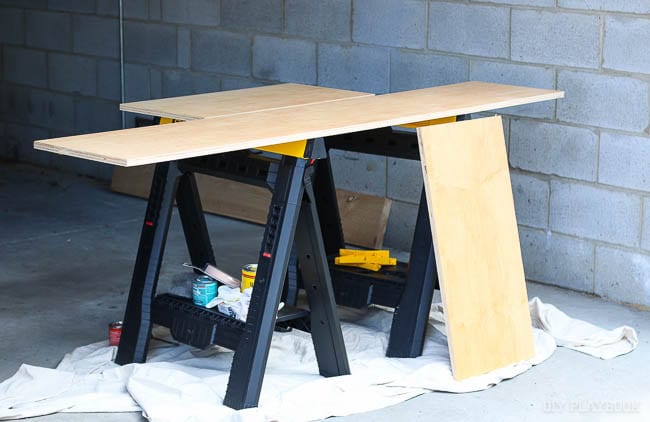
We ended up buying a piece of plywood from Lowe’s for our wood. We got the nicest plywood they had (Birch), and it ended up being about $50. I know what you’re thinking…plywood? But if you follow these next steps, you can make the wood look incredibly high-end.

STEP 1: Get your wood cut to size at the store. We made 3 cuts. One for the top, and 2 equal ones for the sides.

STEP 2: Add a wood veneer edging to the sides of the plywood. This will hide the layers and give the wood a “faux” finished edge. I had never used this stuff before, but oh my goodness it’s magical.


Simply cut the edging to size, place it on the edge of the wood, and use an iron (yes, iron!) to adhere it to the wood. It doesn’t take long for it to adhere and it instantly looks amazing. If yours is a little long or too wide, just shave it off using a utility knife.
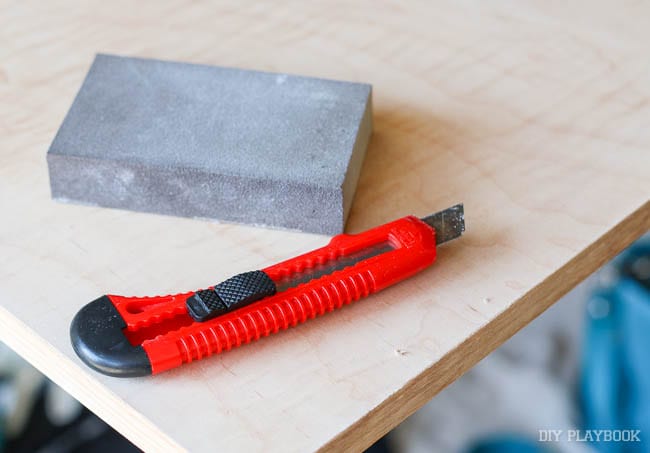
STEP 3: Sand down the wood. I used a medium grit sanding block to sand the wood and make it as smooth as possible. Be sure to do the edges as well. Once it’s nice and smooth, dust it off using a rag or tack cloth.

STEP 4: Condition your wood. This just entails brushing on some wood conditioner in the direction of the grain of the wood. The plywood happily soaked this up. Allow 2 hours before staining (and as always, check the directions on the back of your can).
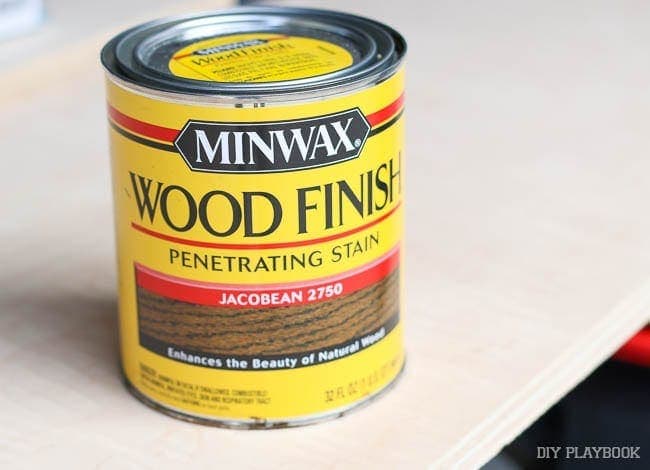
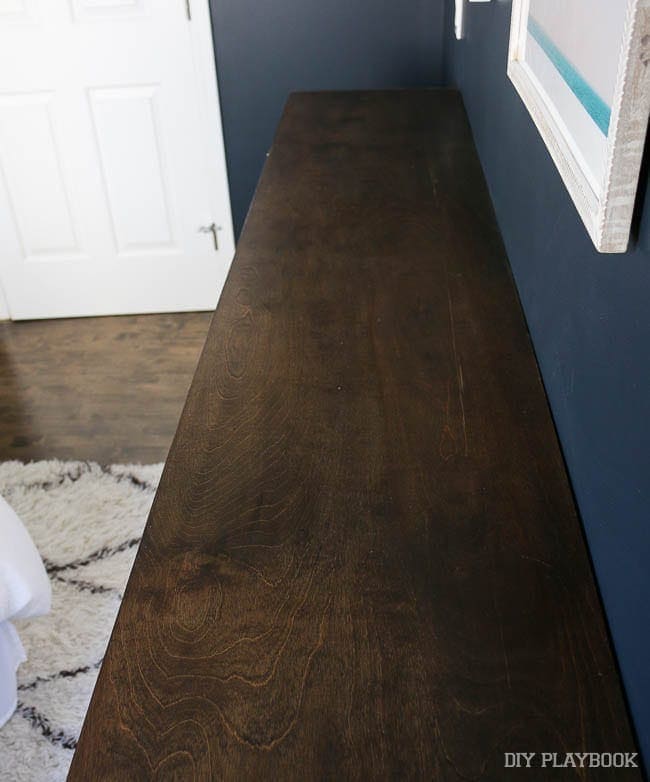
STEP 5: Stain the wood. We went with the color “Jacobean” to match our wood floors. Just use a rag and spread it out evenly over the wood.

Then take a clean rag and go over all of it to make sure there isn’t a buildup of too much stain on there anywhere.

STEP 6: I let the stain dry overnight, and the next day I got to sealing it. I used a water-based polycrylic for this step. Be sure to use a nice brush, and simply dip it into the poly and apply it to the wood. Don’t overbrush it. Once I applied the poly, the wood looked much more vibrant & polished. I was loving it.
You’ll want to do at least 3 coats of the polycrylic and you need to wait 2 hours in between, and also give it a light sanding too. So make sure you do it on a day when you’re home so you can keep tending to your wood. I went back and forth to the garage so many times when I was working on it, but it was well worth it.
STEP 7: Bring your wood to your cabinets and get ready to install it!
BUT WAIT…
This is where things went all wrong for me. When calculating the measurements for the 3 pieces of wood, I failed to include the width of the doors. So the cabinets were actually 15.5 inches deep…not 14.75 inches like I originally calculated. FAIL.

My beautiful wood that I slaved over for days was officially useless. I put it up there and tried to convince myself that it could still work and look a-okay. But with some gentle nudging from my husband, I decided to do it the right way. So I headed back to the hardware store for new wood to add veneer, condition, stain, and seal it all over again.
But since I knew what I was doing, I was able to fly through the steps, and a couple of days later I had new wood. To be honest, it looked even better than my first attempt!

I secured the wood to the cabinet using wood screws. All I did was make a pilot hole inside the cabinet, and then screw through to secure it. Each piece only needed a handful of screws to stay secure.

Rookie Tip: Make sure your screws aren’t too long where they pop out the other side. Also, when drilling your pilot holes put a piece of tape on your bit so you know how deep to drill. This will prevent you from accidentally drilling all the way through!
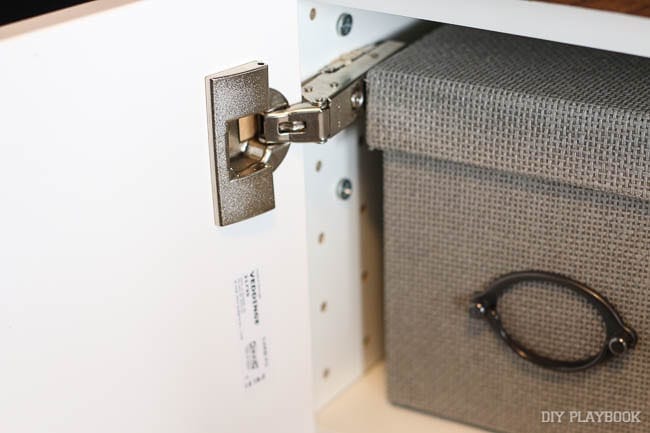

Finn attached the hinges and doors to the cabinets while I worked on the wood pieces. It wasn’t hard…just time-consuming, as most Ikea pieces tend to be.
We ended up installing our cabinets about 6 inches off the ground, so the floating is subtle. But it sure is nice that I’ll be able to sweep under there and keep it clean.


The wood turned out way better than expected. You would never guess that it is plywood. And the deep, rich wood tones fit the guest room vibe perfectly. And I love it paired next to the white & navy.

I have yet to fill these bad boys up all the way. But wow, tons of storage! I’ll probably keep one of the cabinets for guest room essentials…fresh towels, wash cloths, and mini toiletries. In order to avoid doing any angled cuts, we kept the corners simple with the side piece meeting the top piece. It makes for a very clean look.
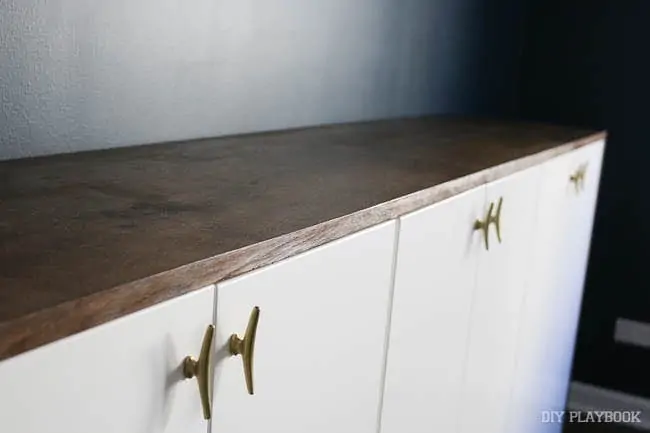
The gold knobs (which we chatted about last week) were a great finishing touch to our new piece.
I’m not gonna lie, this project was more intense than I anticipated. Maybe since I had to do a large portion of the project twice…but still, I’d probably put this in the intermediate DIY category.

But I definitely couldn’t have found a better storage piece to fit this space as nicely as this one does. It looks professional and customized, and wasn’t that expensive to create.
Tomorrow, get ready for a true wide shot of this wall! I’ll show you all of the gorgeous art we hung over the fauxdenza to really bring some personality and style to the space!
Casey