How I Installed A Louvered Pergola By Myself
Three years ago, I shared my design plans for our backyard. In the mockups below, you’ll notice a pergola in the back corner near our garage. We always dreamed of adding one to that spot for shade and privacy.

However, our entire backyard renovation was pricey (more about the cost here) and we simply didn’t have the funds left over for a new pergola.

We still created a little seating area in this back spot of our concrete patio, but it was lacking something. I’m excited to tell you that three years later, our pergola dreams are finally coming true!
Learning About Mirador Pergolas
At the end of 2023, a team from Mirador reached out to see if I wanted to try out one of their pergolas in our backyard. They had seen my outdoor space and thought their product would work well. I went into research mode to learn more about their pergolas and was very impressed with their innovative design.
You can easily purchase their louvered pergola kits on Amazon and they have stellar reviews! A few followers also said they’ve seen them at Costco too.
I decided to team up with Mirador to install the pergola in our backyard and share my honest reviews about the installation and final look with my audience. After measuring my space, I chose the 10×13 111S Takasho louvered pergola, in a cherry oak color. It’s crafted from steel and aluminum and I liked the modern look with the wood grain and black accents.
*If you’re looking to buy this pergola, use code DIYPLAYBOOK for 10% off! Code valid today through 4.20.2024.
The Pergola Delivery

We decided to have the pergola delivered in early March, when the temps would hopefully be warmer than the wintertime. It arrived on a truck in three long boxes and we stored it in our garage for a few weeks until it was time for the installation day.
Getting It On The Calendar

I watched lots of instruction videos and thoroughly read the installation manual so I could see what I was getting myself into. I decided that I could likely do most of the steps by myself, but I would need at least one more body when it came time to physically stand the pillars up.
I put the install day on my calendar and blocked some time on Finn’s calendar so he could come outside and help when needed. Of course, it ended up snowing on the March days I chose (Chicago weather is so wonky in the spring!), but I didn’t let some light snow deter my progress!
Mirador also partners with a professional installation service if you don’t want to go the DIY route. But, I’m hopeful that you’ll be inspired to do it yourself after reading about my experience!
Pergola Installation – Supplies You’ll Need

Everything came packaged, safely and neatly, in those three long boxes. Inside, there was a clear instruction guide and dedicated toolbox of everything I would need to get the job done. I also needed to grab a basic set of tools.
- Gloves
- Box cutter (this is my favorite one!)
- Tape measure
- Level
- Phillips screwdriver
- Power drill
- Wrench set
- Hammer drill
- Hammer
- 2 Step ladders
- Scissors (or my favorite electric scissors if you’re a lefty like me!)
- Saw horses (these came in handy when assembling everything)
Taking It All Out
My first step was to get organized. I used my favorite box cutter and these electric scissors to tear through all of the cardboard. I then moved everything from the garage to the patio and side yard. Every piece is labeled, so I was easily able to group the correct parts together.
Prepping The Four Pillars

The first step is to assemble the four pillars. For this, I found it easiest to prop them up on saw horses so I wouldn’t have to bend all the way over.

You’ll slide the foot plate cover over the pillar and follow it with the foot plate. Your power drill will get a lot of action with this project, so make sure all of your backup chargers are fueled up and ready to go! They’re all pre-drilled holes, so it’s not difficult.
Prep The Side Beams

Following the clear instructions, I prepped the side beams with their corresponding hardware and connected them to the tops of the pillars.
Asking For Help

The directions advise using four people for this step. I didn’t have that many bodies on hand, so I stole thirty minutes from Finn to get these pillars standing up. You’ll need two step ladders for this part too.
You stand the two structures upright and then slide end beams into place and lock them with nuts. This wasn’t difficult, just a tad tricky to get everything in its proper place, with just two of us. If we had another person on hand, it would have been easy-peasy to get this aluminum frame up.
Getting It Aligned & Level

I sent Finn back inside and was determined to get the rest of the project done myself. This next step might not sound that exciting, but it’s the most crucial step of them all. You want to check the alignments of the steel frame and the distance between all of the pillars. If things are wonky, then you’ll have trouble on the next steps when it’s time to add the steel louvers to the top.
For this, I started in one corner and did my best to get the pillar completely plumb (leveled vertically). Take your level and measure against both the inner sides to ensure that everything is straight. Once it’s perfect, you don’t want it to move as you adjust the three other pillars.

Next, measure the distances between the pillars so they’re the same. You will also want to measure the diagonal distance between the opposite corner pillars. I did little taps to get everything straight and equidistant, trying my best to keep that original pillar in its place.
I’m not gonna lie, this step took way longer than I anticipated. I had to start over a few times because I simply couldn’t get everything straight and in the right place. Just take your time and do it right.
Prepping The Louvers

Now that the main structure was complete, I could focus on the top of the Mirador pergola. This particular pergola comes with 25 louvers and each one needed hardware screwed in on both sides. That was 100 screws to put into place. Again, this wasn’t a difficult task, just a tad tedious and time-consuming.
Put on your favorite podcast (I’m a huge “We Can Do Hard Things” fan), prep your louvers on saw horses, and get ‘er done!
Install The Louvers

Once the hardware was installed, it was time to attach each louver to the top of the pergola. This would have been easier if I had another person to help, but I was determined to get it done by myself. I went up and down the ladder, grabbing each louver and putting it into place with brackets.
When all 25 were in place, I added a long strip to connect all of the louvers. This allows the crank to control all of the louvers at once. This was secured in place with little pins on each side. Finally, I drilled four pillar covers to the top corners.
Securing The Pergola To The Ground

I was overjoyed to make it to the last step – securing the pergola into the ground! The kit comes with the drill bit you’ll need for this step. You’ll need to use a hammer drill to drill through concrete. If you don’t have one, you can rent one from your local hardware store for a few hours to get this step done.
My cordless hammer drill is okay, but not the most powerful. I found that I really had to put all of my body weight onto the drill to get deep enough into the ground. I was sweating during this step! If possible, I would go with a corded hammer drill with a bit more power.
Once the hole was drilled, I took the bolt, hammered it into place, and tightened it with a wrench. After doing four of these on each pillar, this bad boy wasn’t going anywhere! It’s a very stable structure and can withstand up to 73 mph winds.
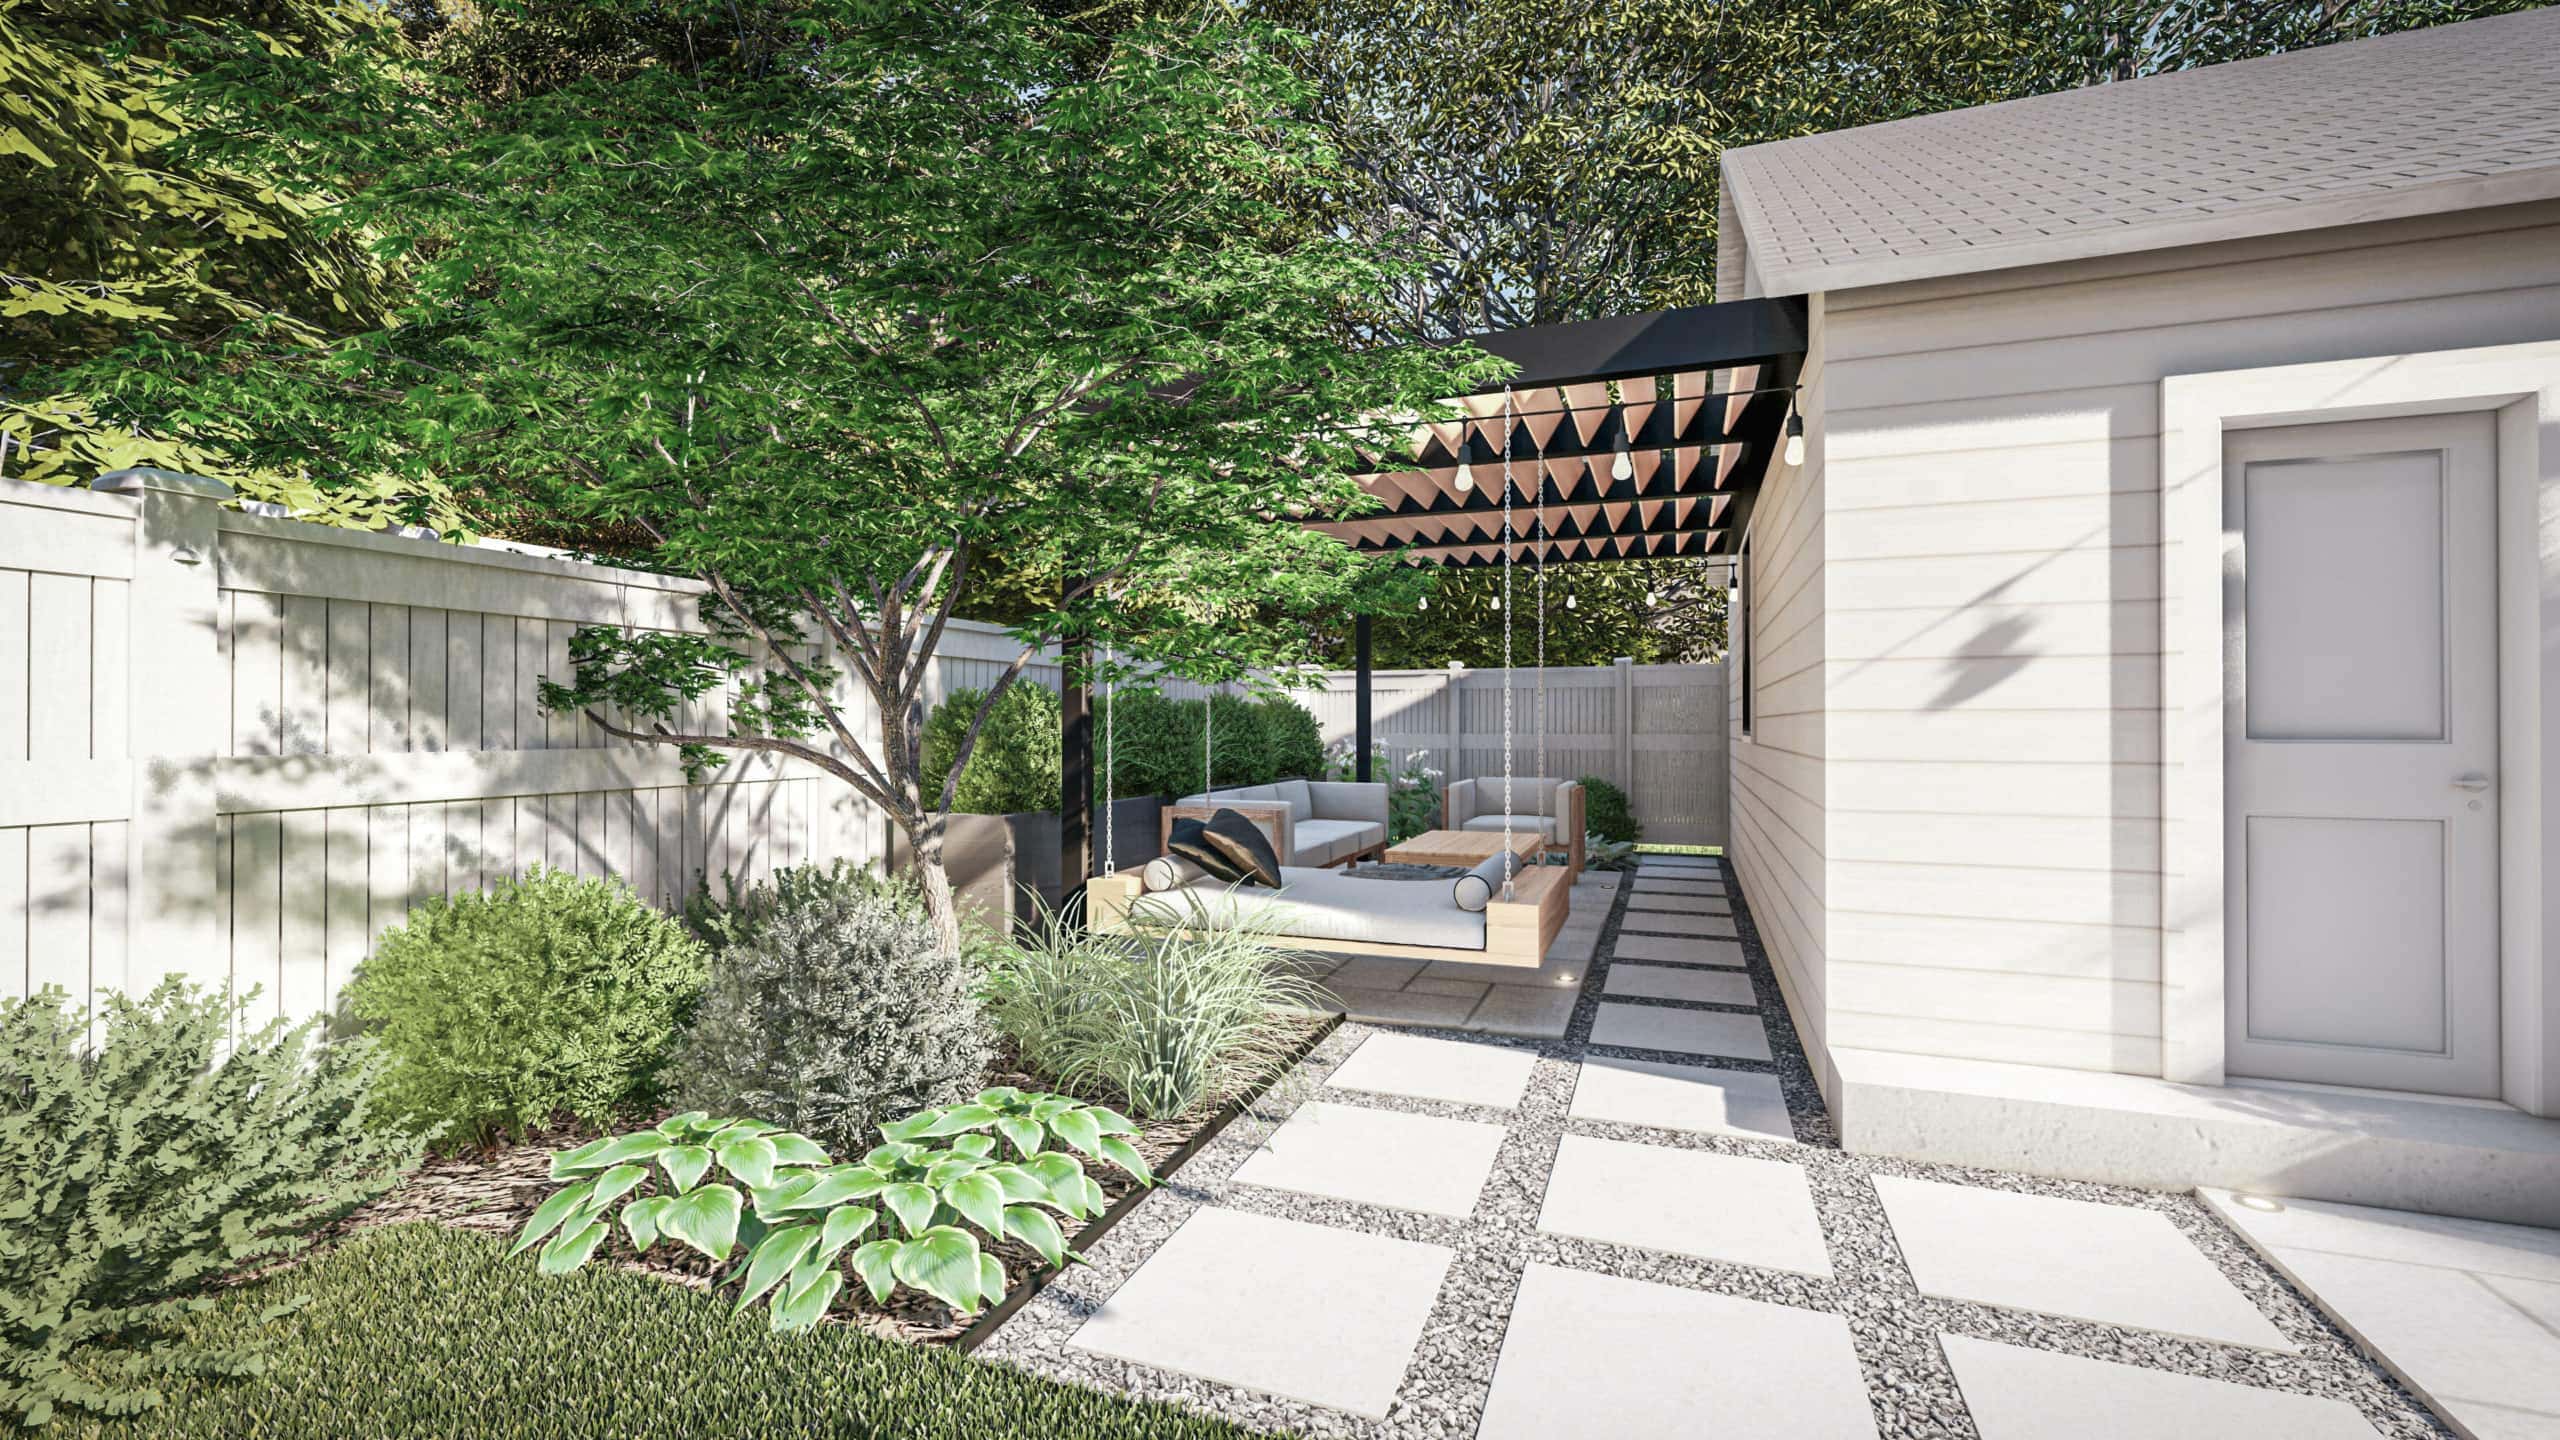
Our New Mirador Pergola

Holy smokes. I knew I wanted a pergola, but this has dramatically changed the look of our backyard! I’m obsessed with the end result.

The clean lines work well with our modern backyard and I adore the warmth the cherry oak finish adds to that corner of our backyard. Whenever I hear the term “cherry oak”, I get worried that the wood finish will be too red. This has a nice brown coloring.
Because it’s fully aluminum, it’s built to withstand the test of time. I know that this will look good for years to come. And the best part? No maintenance! This pergola is designed to withstand even extreme weather conditions.
The Adjustable Louvered Roof

I’m most impressed by the easy-to-use crank system. I can effortlessly open and close the adjustable louvers, which gives me control over the amount of sunlight, shade, and ventilation in this space.

This area of our yard gets HOT in the summertime, so it’s going to be so nice to block the sun when hanging out back here. I can say with full confidence that this feels like a luxury pergola!
Integrated Drainage System


I’m also very excited that our patio furniture is going to stay dry! When the louvers are closed, (which is how I keep it when we’re not out there), the adjustable roof keeps everything dry below. I loathe putting the furniture covers on and off when rain is on the way, so this will be so much easier!

The pergola has an integrated guttering system. It whisks the water away and into the pillars so the underside of the pergola stays dry. We’ve had lots of rainy spring days and this whole area stays dry!
Before & After


Here’s the space with and without the pergola. It makes such a big difference in our yard. They also sell these shade screen accessories and I may add on a few to truly make this feel like an outdoor room.
Feeling Proud Of Myself

I felt very accomplished after this project. The weather was less than ideal, but I persevered! I would say it took me about 4-5 hours to get it done by myself. If you had two or three people working on it, you could easily get it done in an afternoon. Or, go with the professional installers and your new pergola will be up in no time at all.
Time For Furniture

Now, it’s time to get my furniture out here and ready for the outdoor season. I ordered this new outdoor coffee table and three of these lanterns to hang from the pergola.
I plan to show you the finished product in a few weeks. This new pergola is the perfect way to usher in the new season! It’s going to be a gorgeous outdoor living space by the time I’m done with it.
I Need Your Landscaping Ideas

Now that the pergola is up, we are planning on new landscaping on this side of the yard. Our Japanese Tree Lilacs are diseased and need to be replaced. We’ve also lost a few bushes and it’s just looking very sad and bare.
We would love to add another tree to this area – one that is a wider and expansive, and not quite as straight, up and down..

I’m also not sure what we’ll do with the back corner near the fence. I need to get my butt to a landscape design store to talk through some ideas with a professional! In the meantime, I would love your thoughts if there are any gardeners out there…