Guest Bathroom Renovation – Progress Report
So today’s weekly bathroom renovation post was supposed to be all about the tiling in the guest bathroom. But instead, I’m here to tell you that the bathroom renovation is going oh.so.slow and I won’t be chatting about tiling until next week.
When I first planned out the project, I naively reserved every weekend in May thinking we could easily finish the entire project during that time. Boy, was I wrong. In fact, the project is probably taking double the amount of time I had planned.
Where Are We Now?
But before we get to all of the reasoning behind our glacier speed, let me bring you up to date on where the bathroom sits currently.
After our demo weekend, our contractor came in and hauled away all of the trash from the room. He also moved the plumbing in the shower, built a shower pan, a shower niche, and prepped the shower and floors for tile. Here’s what it looked like after he left…

 What’s Slowing Down our Bathroom Renovation?


 What’s Slowing Down our Bathroom Renovation?
We had our shell of a room all ready for us to get to work and start tiling! But wait, there were a few things we had to do before we could lay any tile and these are the main reasons for our slow speed…
Prep Work

We didn’t realize how much prep work was still to be done before we laid the floor tile. Yes, the contractor installed all of the cement boards, but we still needed to make sure everything was even, flat, and all holes were filled. Our contractor walked us through exactly what we had to do…mainly mix up some thinset and fill in every crack and hole throughout the entire room both on the walls and the floor. 
One entire day was spent going around the bathroom filling holes and making everything even and smooth throughout the space. We also taped all seams where the cement boards meet, because even the slightest dip can affect the application of the floor tile. The thinset then takes a day to dry, and then the next day you have to sand and shop vac all of the dust so you have a clean and blank space to work with.
It was during that cleanup time that we noticed something bad…
Uneven Flooring
In the left corner of the room, we noticed that the floor was dipping a bit when you pushed on it. Not good! The last thing we wanted to do was lay down floor tile that was unsupported. I made an emergency call to my contractor who came over and literally ripped up the floor to see what was going on underneath. 
And guess what was going on under there? Absolutely nothing! There was no support beam in the corner to hold up that part of the floor. In fact, he said he could see our neighbors ceiling directly through the hole. OMG. Not good. Luckily, he was able to add some support beams to get it sturdy and safe in there. But then we were left with this…
He couldn’t add more cement board because it would be way higher than the rest of the boards. So he gave me detailed instructions on how to level the floor using a self-leveler. Oh boy, another thing to push back the start of our floor tiling. 
It’s not a super hard project, but you gotta make sure you do it right. First, you paint a primer onto the area that needs to be level.  Also, make sure you tape around any vents or holes (like our floor vent & toilet hole). I also plugged up the vent with plastic bags to make sure absolutely nothing got under there.
I used a floor level to mark the areas that needed to be brought up in height, so I’d know exactly where to pour the mixture. 
After mixing up the floor leveler with a mixer on my drill, I was ready to pour! 
I didn’t get any pics of me pouring since it was super heavy and went really quickly (and I was doing this at home by myself). But here’s what it looked like after drying for a few hours. I made sure the floor was level and it actually worked really well.
Okay, so our bathroom was prepped and our floor was level. Finally time for tile!
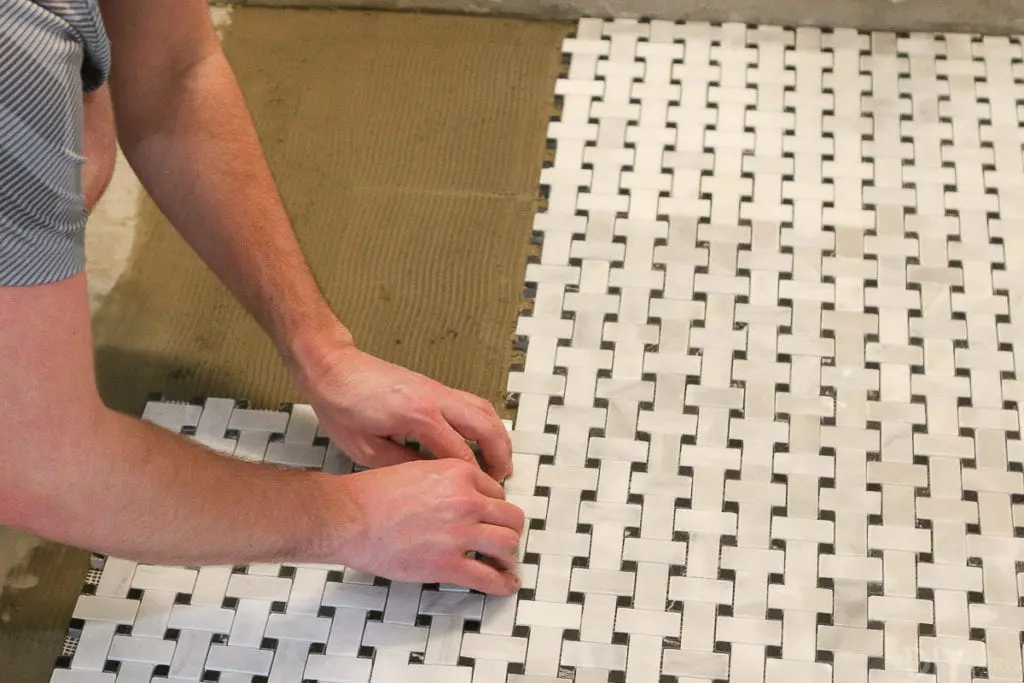
Hard to Cut Marble Tile
Finn and I were so excited to start building this bathroom back up, and the first big project was to lay the floor tile. Because I chose 12×12 tiles, I figured we could knock this out pretty quickly because they’re so large. But I soon realized that wasn’t going to be the case…
See our tile there? Well, there are no straight edges on any side of it. That means that in order to lay anything against the wall, every single piece of tile has to be cut. Not ideal. But here’s what’s even worse…
Marble tile is incredibly tricky to cut, especially as a newbie tile cutter. The stone can crumble very easily and it’s hard to get a straight and perfect cut. Not to mention, that when the tile would get wet, the pieces would pull off of the mesh backing. So things got very messy, very fast.
 Ultimately, we prevailed (and I’ll have all the details about laying the floor tile next week). But it was a lot of slow and tedious work to get there. Not to mention lots of long days and nights to get the floor tile cut, laid out, and attached to the floor.
I still absolutely love the tile…it’s gorgeous! But would I choose it for my first big tiling project? Probably not. Just something to keep in mind if you are planning your own bathroom renovation.
Between all of the prep work, the floor debacle, and the tricky marble tile….we were off to a slow start rebuilding our bathroom. It just goes to show that you can plan your brains out, but you never know what’s going to happen when you actually tear apart a room and get started. This isn’t to deter you from DIY’ing your own bathroom, nor is it just a post to vent about all the things going wrong in this room (okay, maybe it’s a teeny tiny bit about that), I really just want you guys to know that things will go wrong when you DIY. BUT if you keep trying, you will figure it out!
Casey
Catch Up on the Bathroom Renovation
- Bathroom Planning
- Bathroom Mood Board
- Our Demo Weekend
- Bathroom Progress Report
- Tiling the Floor
- Adding Subway Tile
- Choosing a Dark Gray Paint Color
- Painting the Bathroom
- How to Install a Vanity
- How to Hang a Mirror
- Bathroom Renovation – Reveal
- Storage Solutions for Small Bathroom
- What We Learned Renovating Ourselves