Reader SOS – Shared Kids’ Room Design
I’m back with another “DIY Playbook, Save our Space”. My plan for #DIYPlaybookSOS is to take a reader’s space and (virtually) offer design tips and tricks on how to improve it.
Here are some of my favorite design solutions from this series…
- Budget Powder Room
- Designing an Open Concept Living Space
- Bedroom & Office Combo Space
- Family Game Room
- Creating a Functional Entryway
- Reader SOS – Where Are They Now?
How Do I Design a Shared Kids’ Room?
I’m very excited about today’s Reader SOS because it comes from a very important reader – my assistant, Lindsey! Lindsey is the mom of three little ones and her two boys share a room. When they moved into their current home, she quickly bought a bunk bed off of Facebook Marketplace, and used some of their nursery decor to decorate the space. Now that they’ve lived with it for a while, she is eager to create a thoughtful shared kids’ room for her growing boys. Let’s read her design dilemma…
Lindsey’s Design Dilemma
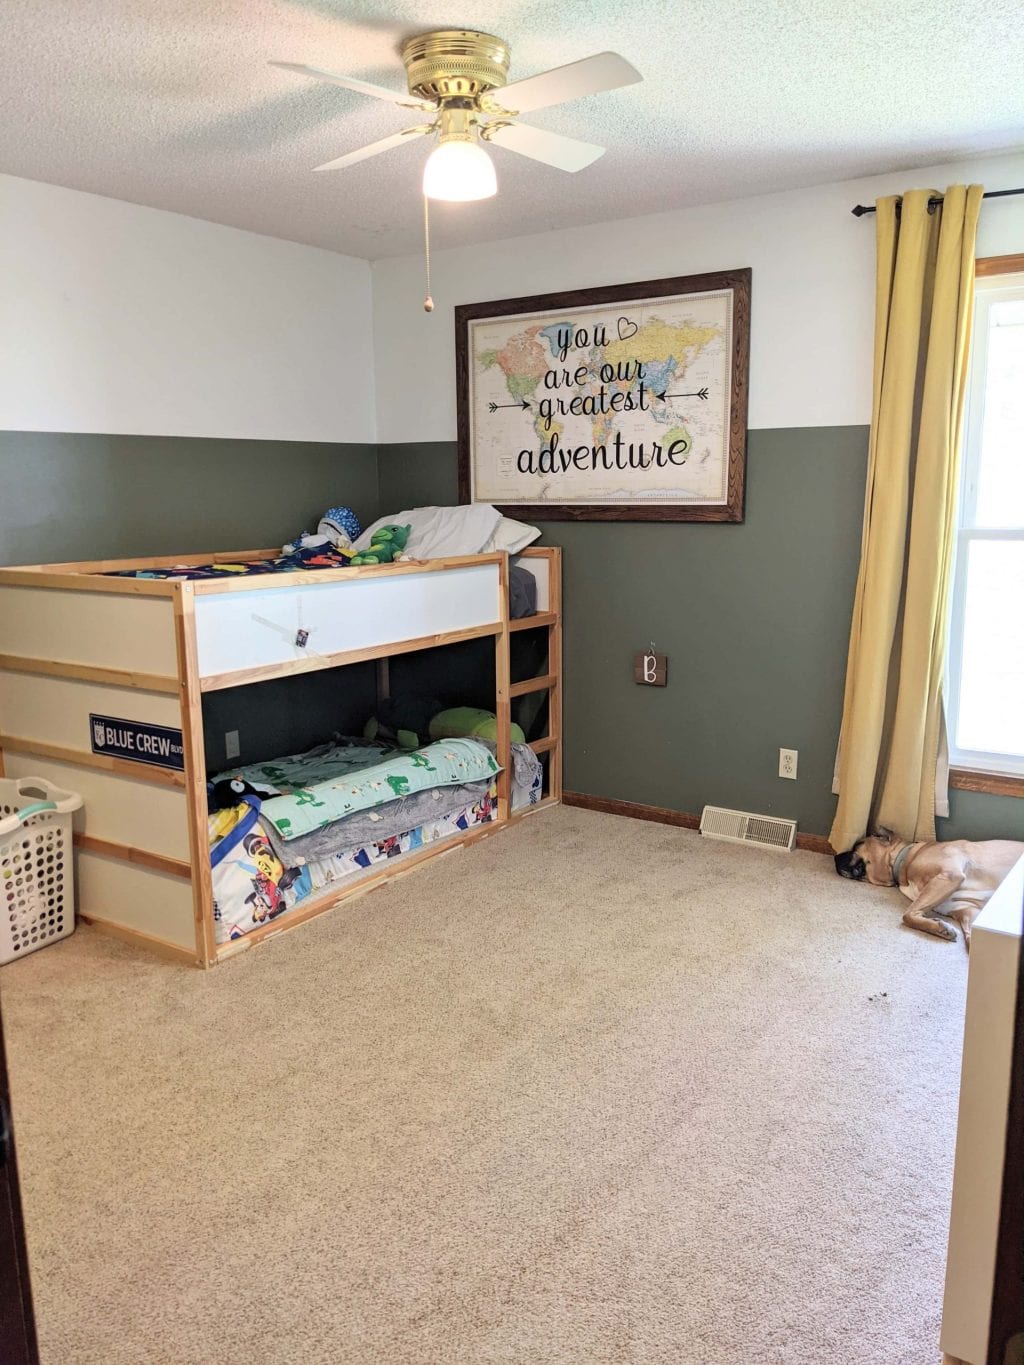
I need help creating a shared kids’ room for my two boys (ages 5 and 3.5). My challenges are making a kid’s room that is true to what they love (they like cars, trains, and airplanes), but also works well with the rest of our home. We live in a ranch home, so everyone sees all our bedrooms. We didn’t do much to update the decor besides getting a new bed when we put them in the same room and transitioned from a nursery to a kids’ room.
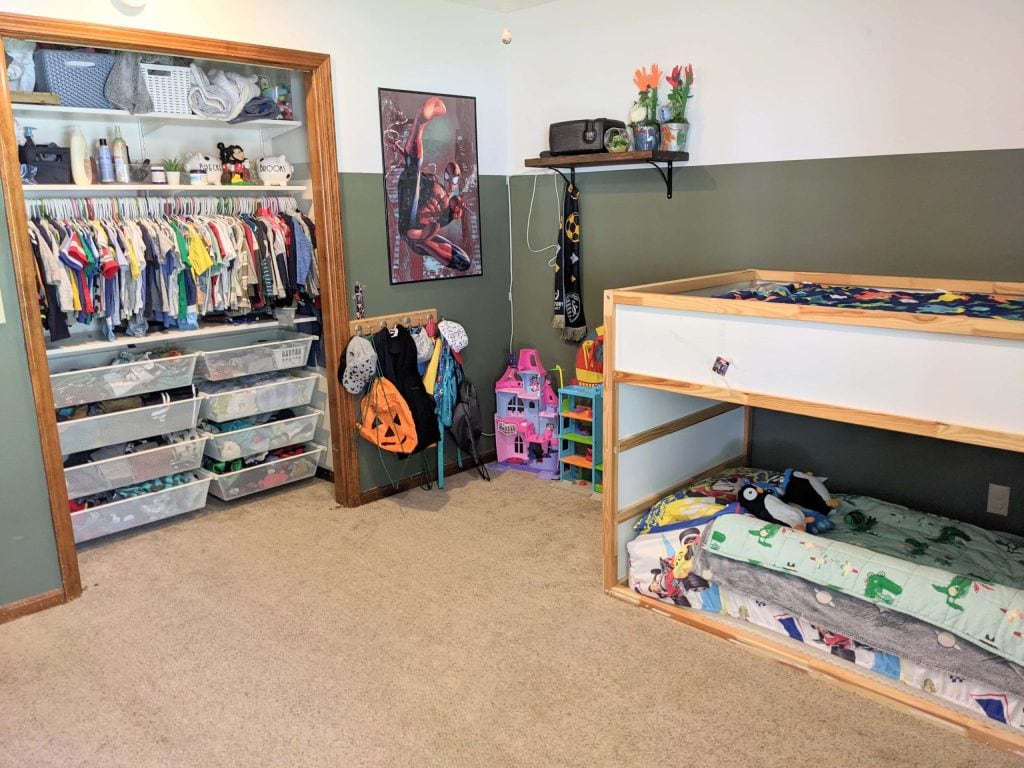
Also, we had bifold doors on the closet when we moved in, but they were in bad shape, so we took them off. Do I replace them with a new bifold, a slider, curtains?
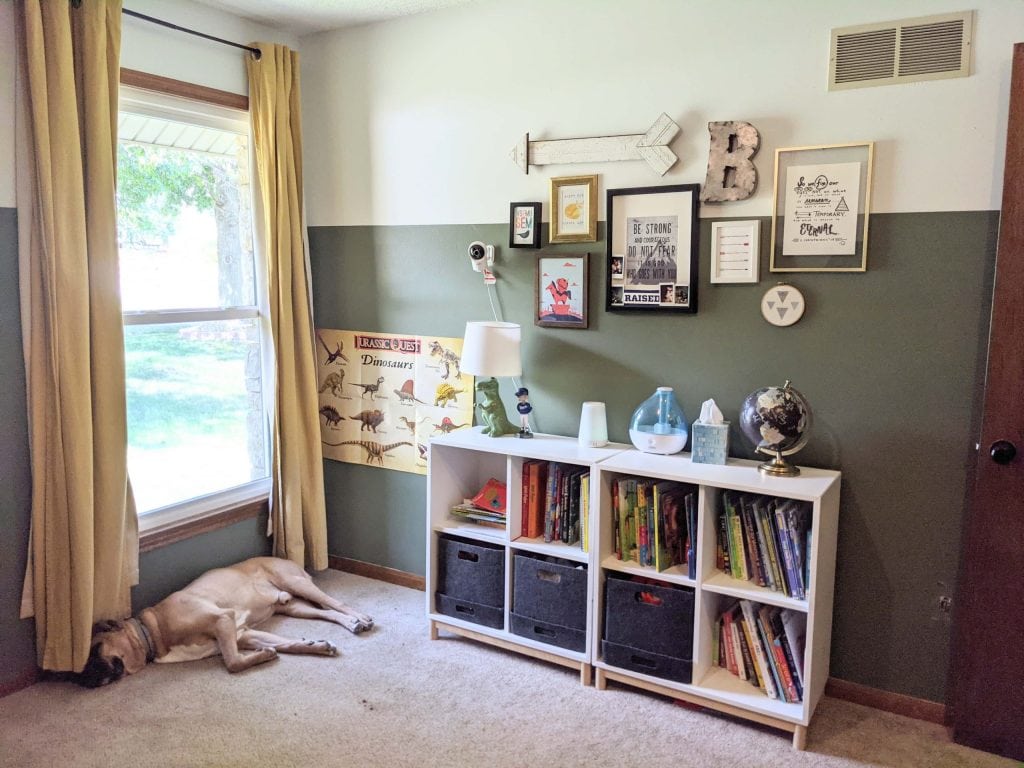
Our kids don’t love the bunk beds, so those can go and I want to update the lighting, curtains, art, and storage in here. Most of the wall art was from the nursery, so it’s a bit “babyish”. Oh, and we’re not afraid of a little DIY!
Creating a Shared Kids’ Room Design
I am so excited to help Lindsey with this space. First, the room is a great size (12×12) and it already has such good bones. I absolutely love the two-tone wall treatment (Behr “Minimalistic” on top, and Behr “Halls of Ivy” on bottom), with that gorgeous shade of green. While I’ve never done a shared kids’ room design before, I am up for the challenge. Here’s the gameplan…
- Sell the bunk beds and buy two twin beds
- Buy new bifold doors and upgrade them with trim and paint
- Add custom wood treatment near the closet, with hooks
- Add nightstand with table lamp and a large area rug
- Buy new patterned/blackout curtains
- Remove ceiling light and replace with fixture
- Create DIY art for the walls
- Focus on hidden storage (new hamper, bins for toys, etc.)
Let’s dive into the details.
New Twin Beds
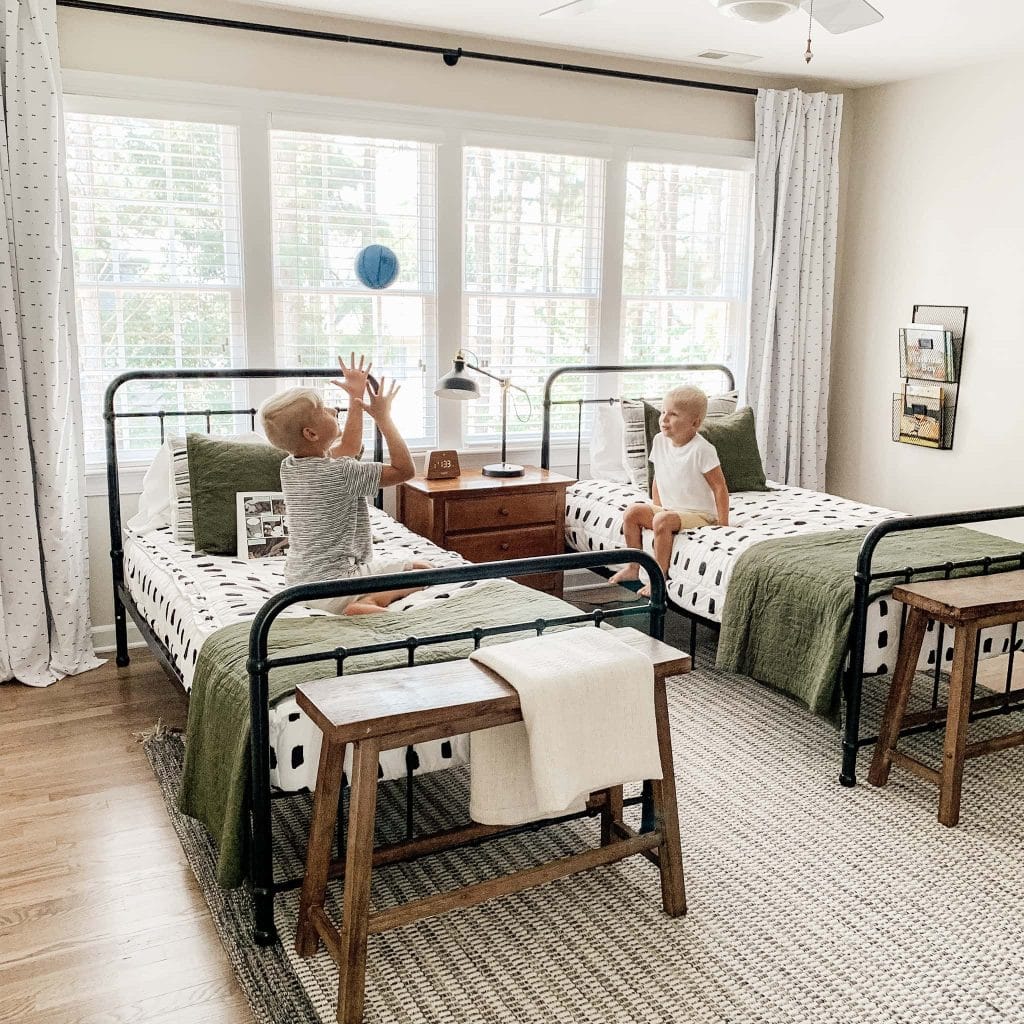
First order of business…sell the bunk beds that are not working for the family and purchase two twin beds. (Tips on how to sell here!) I love the look of the ones in my inspiration, above, with the black curved detailing. I found these similar bed frames and they’re a great price with stellar reviews. I would place the two new beds on the wall where the bunk beds are currently placed.
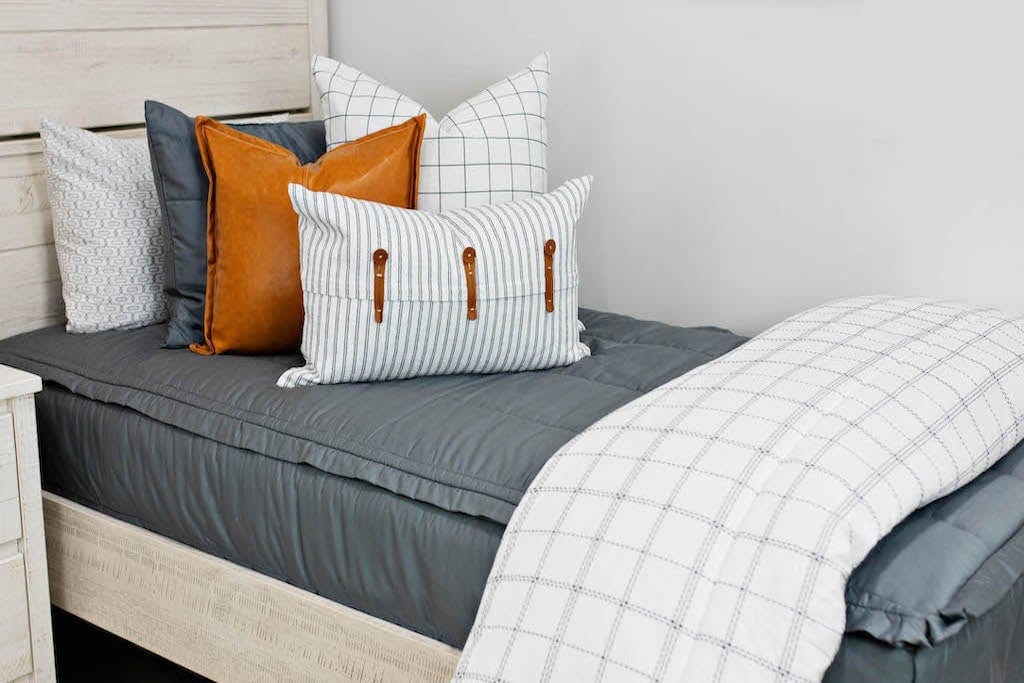
While I’m not a mom of a child with a real bed yet (probably soon!), I have heard amazing things about the brand Beddys. They have zippered bedding that makes it really easy for a child to make their bed, so the room always looks neat. (I love the sound of that.) It is a bit pricey and when I talked to Lindsey about it, she said, “They better be taking those to college with them!”, which made me laugh out loud. I like this dark gray bedding, paired with some green and blue pillows and a navy quilt. If you wanted a less expensive bedding option, you could go for this cute comforter.
Add Bifold Doors to Closet
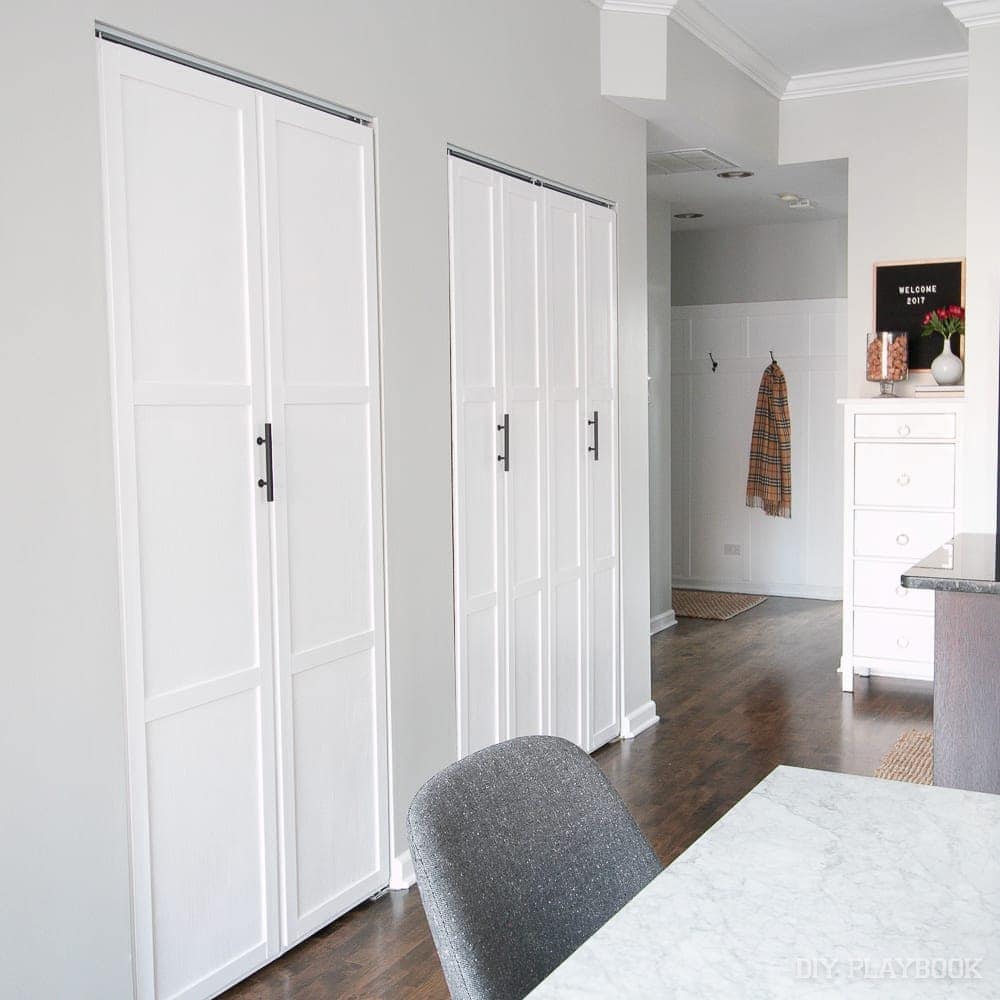
As of now, the closet is door-less and that’s because the bi-fold doors they had broke when they first moved in. Even though the closet is super organized, seeing all of the stuff inside can be a little overwhelming. I’d suggest getting new bifold doors. If Lindsey doesn’t want to shell out extra cash for bi-fold doors with detailing, she could opt for plain ones and add her own lattice and trim. That’s what I did to the bi-fold doors in our condo (above) and they turned out amazing.
I think it would be really cool if she did the two-tone paint technique on the doors, with the green on the bottom and white on the top, so they line up perfectly with the walls. I’d then opt for these gold handles to pop against the green.
Wood Hook Wall
To the right of the closet, they currently have a small hook station.

I’d suggest making this a bigger statement for vertical storage with wood pieces added directly to the wall. She could add two larger/thicker boards across, with vertical lattice trim, and then add gold hooks to complement the gold handles on the closet door. This would be a cute spot to add backpacks, jackets, hats, etc.
Rug, Nightstand, Light Fixture, & Curtains
Okay, so we’ve got the beds figured out, the closet, and we’ve even added a cool wood-wall feature. Now, time for the fun stuff…the decor. This room is begging for an area rug (yes, even over carpet) and you guys know how much I love rugs from Loloi. They’re thin, inexpensive, and great for a kid-friendly home because they hide dirt and spills like no other. I’m digging this one in the brick/blue color. My guess is Lindsey would need an 8×10 for the space and would probably need to use some rug tape to keep it in place.
In between the two twin beds, I’d opt for a wood nightstand like this one with two drawers, one for each boy. Since they like to read in here, she absolutely needs a table lamp and this is such a cute one, plus it ties in some of the rug colors! Oh, and I’d swap out the ceiling fan for this black and brass industrial light fixture.
Since it’s a kids’ room, blackout curtains are always a good idea. I like these windowpane patterned ones in dark gray. I’d suggest installing high and wide off of the window with my go-to brass hardware.
Focus on Hidden Storage
I really like the storage piece they already have on the wall, opposite the beds. The only thing I would change is to opt for textured baskets in the bottom row of cubbies, instead of the gray. That will add a bit of texture and warmth to the area. But other than that, I love the piece and it is so great for all of that book storage.
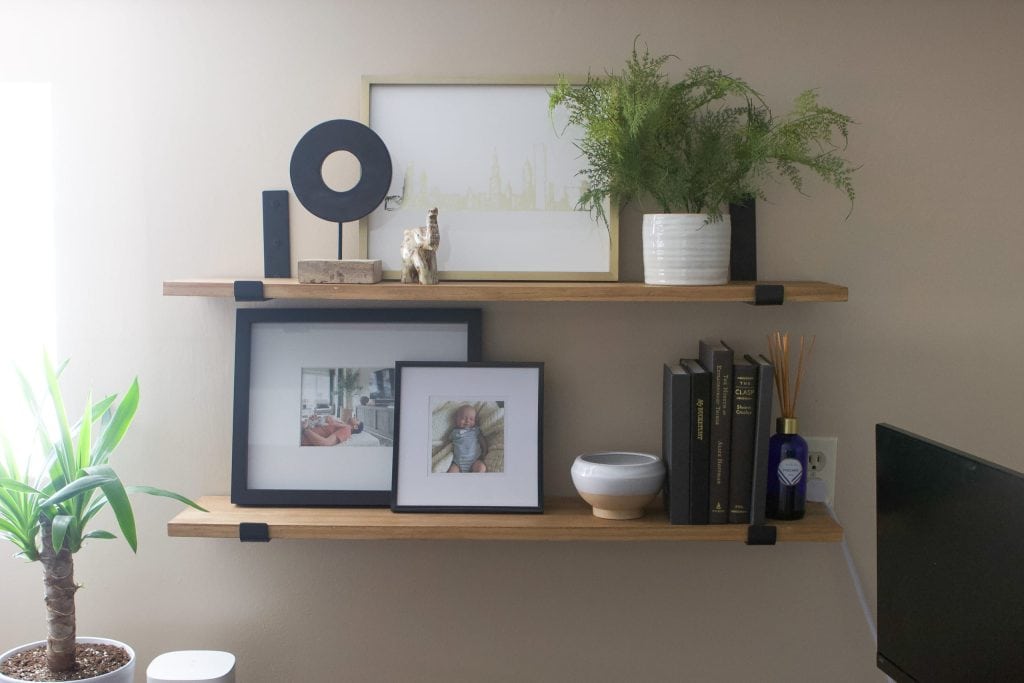
Above it, I think she has a few options. She can revamp the gallery wall to remove a few of the baby quotes and replace them with something more age-appropriate for her boys, and some of the DIY wall art that I’ll explain below. Or, she can build some wood shelves to hang over the storage unit, similar to my wood shelves for Finn’s office – simple, with black brackets. On it, Lindsey can use my kids’ room shelf decorating tips to display favorite toys, books, and sentimental family pieces.
Also, Lindsey mentioned that they need a cute hamper in here. I’d place this one to the left of the book storage to hide the dirty clothes in style.
DIY Wall Art

I’m so excited about the final piece of the room, to incorporate their love for all things that go, like trains, cars and planes! My friend, Bridget, is a photographer, and she made the coolest piece of DIY wall art for her kids’ room. I think this idea would work perfectly for Lindsey, who is also a photographer!
Bridget’s boys love mail trucks, so she took a picture of their toy mail truck on a blank background and had it blown up. It’s now statement art over their dresser and she created it for only a few bucks. I would encourage Lindsey to take some pictures of her boys’ favorite toy cars, planes, trains, etc., and get them printed large for the room. She might want to have each boy choose his favorite toy and then display the photo over his bed! It would be a wonderful way to incorporate mom’s talent as a photographer, with her children’s interests. Win, win!
Shared Kids’ Room – Design Plan

Twin Beds // Wicker Hamper // Rug (Brick/Blue) // Wood Nightstand // Table Lamp // Light Fixture // IKEA Storage // Green Pillow // Striped Lumbar // Wood Shelf Brackets
What’s Next?
Lindsey and her husband plan to tackle this room in the upcoming months, so I’ll report back if they make these changes. It will be fun to see which ideas they implement for this adorable shared kids’ room.
Casey