Choosing Our New Kitchen Cabinets
I already revealed the cabinet colors we’ll be using in our upcoming kitchen renovation in this design plan blog post, but really choosing the color is such a teeny tiny part of buying kitchen cabinets. To me, finalizing the size and function of each one of the cabinets and drawers was the most crucial part of the kitchen process. The cabinets are an expensive purchase (like whoa!) and they dictate the flow, function, and look of your entire kitchen. They’re kinda like the backbone of any kitchen design, so we spent hours and hours figuring out this gameplan.
I wanted to walk you through our process and share the things we did along the way to make sure we were creating a kitchen space that will work well for our little family of three.
List Must-Haves
First, Finn and I sat down and listed our must-haves for the cabinets. People always ask me how we get on the same page when designing rooms and the truth is it’s all about communication. It’s hard for me to know Finn’s dream kitchen unless we have a conversation about it. And if there is something that is on his list as a must-have, it’s good to talk about that before we get very far into the design process. If he were to bring something up that he really wants when we are further along in the design process, it could derail the entire design. So, discussing this way ahead of time was crucial for us!
We sat down together and came up with this list…
- Pull-out trash can
- Hidden microwave (We wanted to keep this housed in the pantry and out of sight.)
- Deep drawers for pots and pans
- A small area for open shelving that I could style!
- Glass cabinets to show off our glassware and wine glasses
- Appliance garage to clear up counter space
- Dedicated pantry area
- Larger island
- Wine fridge
- Double oven
- Somewhere to mount our Frame TV (This was a specific Finn request!)
- Large cutting board area
- Large range with hood
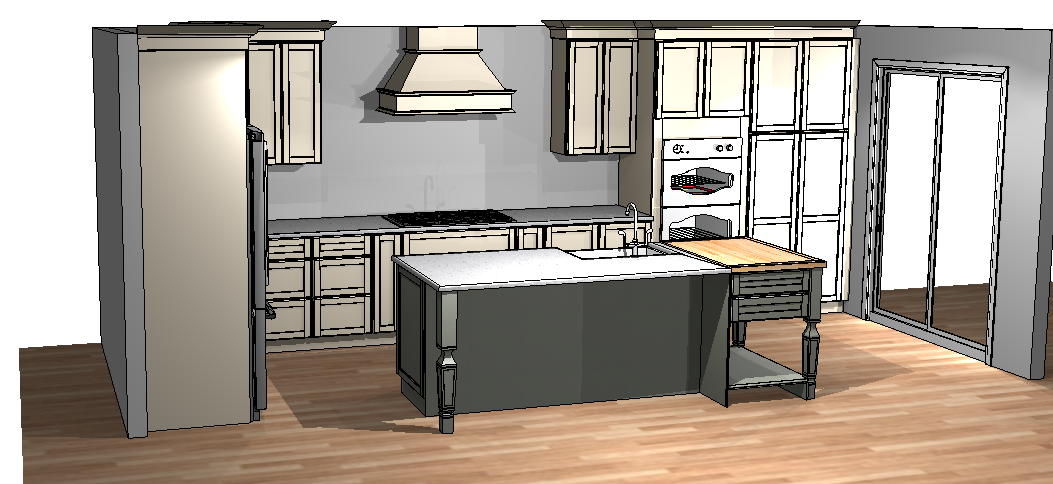
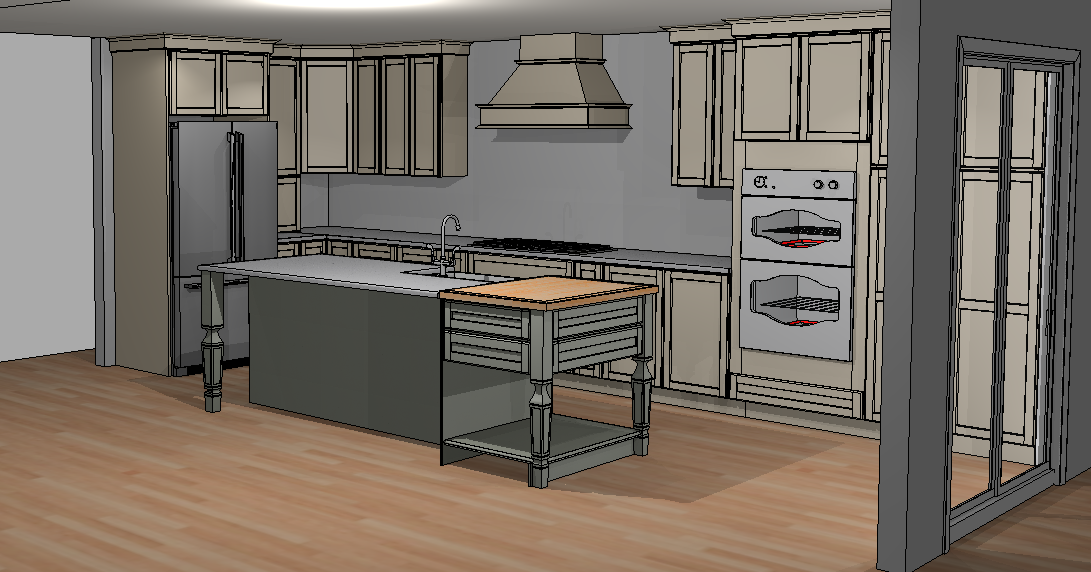
Kitchen Cabinet Layout & Dimensions

We communicated our list of must-haves to our kitchen designer when she made the blueprints and she kept everything in mind as she figured out the layout of our kitchen. For example, knowing that we wanted a double oven (as opposed to a range/oven combo) was crucial when figuring out the new layout. Once we received her blueprints, we felt comfortable meeting with the cabinet designer to finalize each individual cabinet and their locations within the kitchen.
If you remember this blog post, I worked with Joseph from my local Lowe’s store (the Wicker Park location) to design Rory’s built-ins (Yes, you can use kitchen cabinets for built-ins!) He was a dream to work with and we had a blast creating that gorgeous piece. I knew he would be on board to help design the kitchen, so I sent over the dimensions and blueprints and he got to work figuring out the cabinetry! Also, working with a designer at Lowe’s is completely free (and no this isn’t sponsored in any way!).
Choosing Colors, Finish, & Design

Once Joseph had all of the dimensions and the layout for the new kitchen ready to go, we got to work on the fun part…the colors, finish, and design! Lowe’s carries a few brands of cabinetry, but I decided to go with KraftMaid because I love the quality of the cabinets in Rory’s nursery and we had a great experience with the company. (The cabinets were delivered in four weeks!).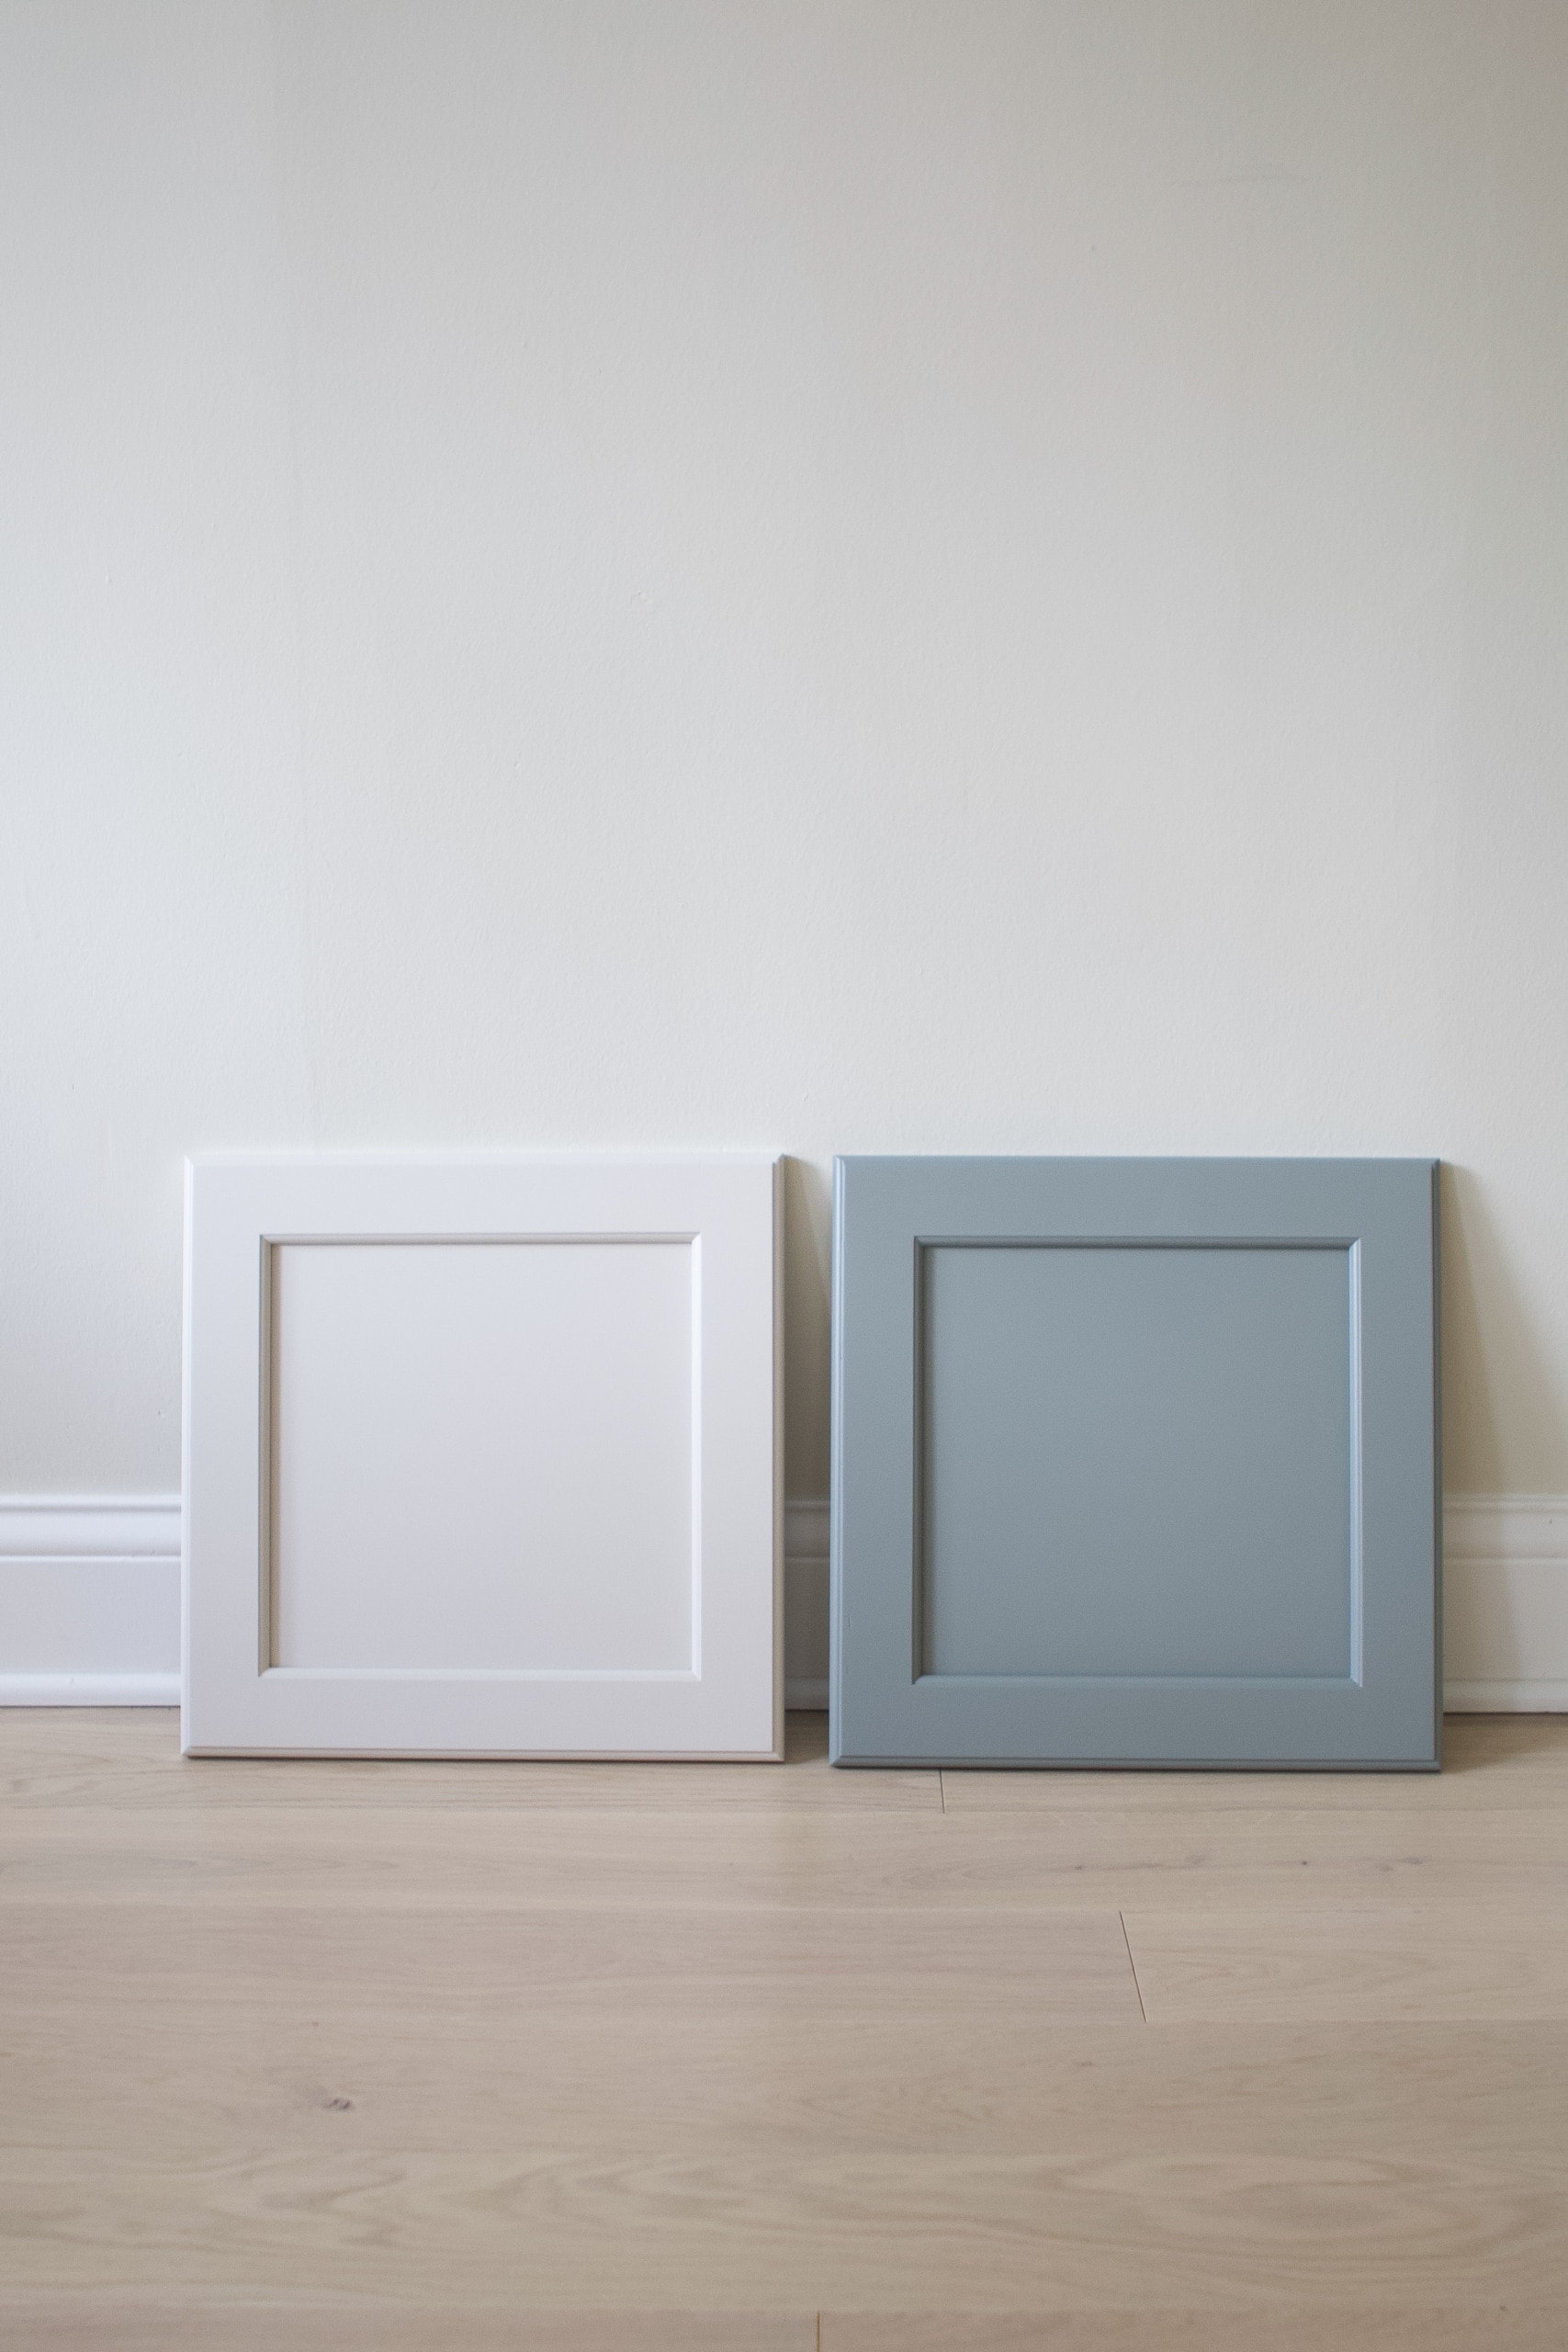
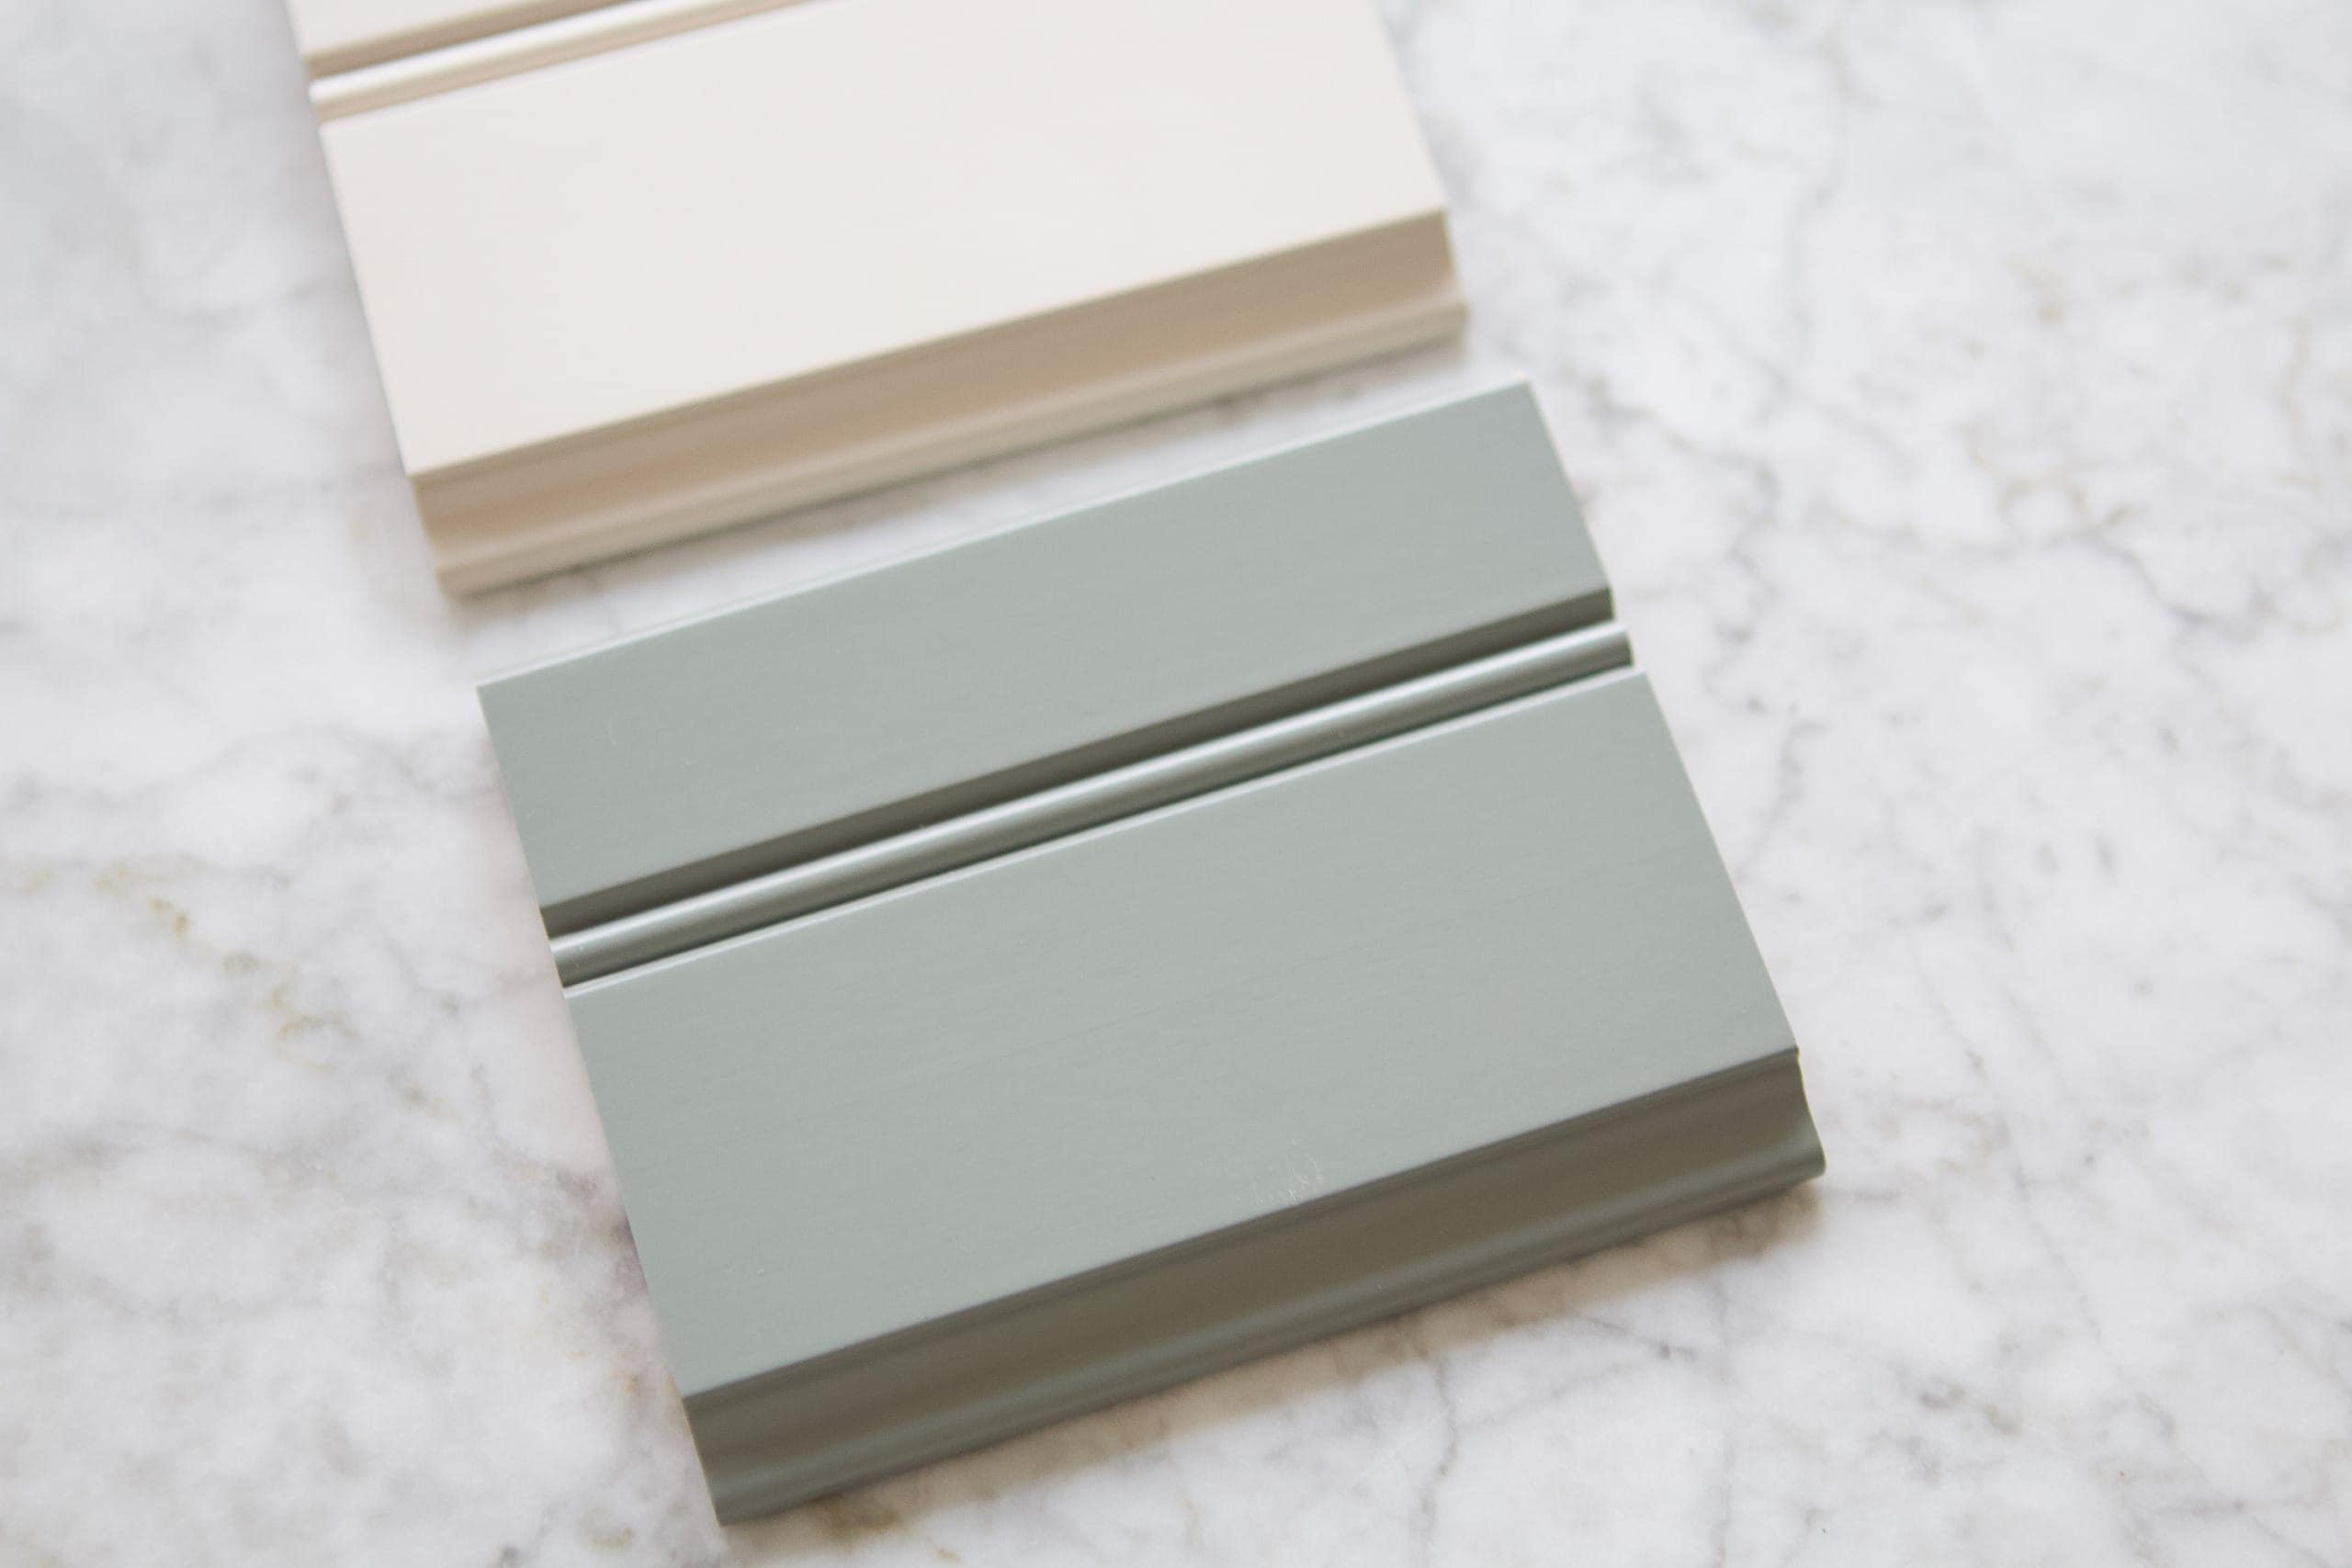
I looked at tons of samples in store, and ultimately I decided to go with the color “Bonsai” on the island (same color as Rory’s built-ins) and the color “Cottage” for the rest of the cabinetry. I chose a suede topcoat that is a super soft sheen that provides resistance to scuffs, dents, and more.  In terms of the actual design of the cabinet, I decided on the “Gentry” line. This has a classic shaker style look with a tiny bit of detailing on it. There are tons of decisions to make throughout this process, but Joseph was incredibly helpful. I just told him the look I was going for and he showed me samples that fit my vibe. You’ll spend a lot of time with your cabinet designer, so make sure you get along well and they “get” you!
Making It Functional
Okay, so we had the brand, color, and design but we still didn’t have all of the cabinets figured out. That’s when I brought Finn in to help me. He is Mr. Organizer and he is also the chef in our household, so I wanted to make sure that when it came to the storage of the kitchen, he was heavily involved. As most of you know, Finn is an Excel whiz, so in order to wrap his mind around the kitchen space he mapped out every wall in Excel. (And don’t ask me how he does this…I have nooooo clue!) 
Do I think you need to build this in Excel in order to create your dream kitchen? No. But if this is a good way for you to wrap your head around a space, then go for it! This worked for Finn, so I let him do his thing and ultimately it made the project sooo much easier for us both! Because we knew the total number of inches we could use on each wall, we were able to easily play around with swapping a 36-inch cabinet here with an 18-inch cabinet there. 
Finn and I spent days (like really at least an entire weekend) going over these drawings again and again. We looked at each and every cabinet in our current kitchen and took note of what was in each one. Then, we wrote down where it would go in the new kitchen setup. We had our tape measure handy the entire time so we could get a visualization of the size of each new cabinet. 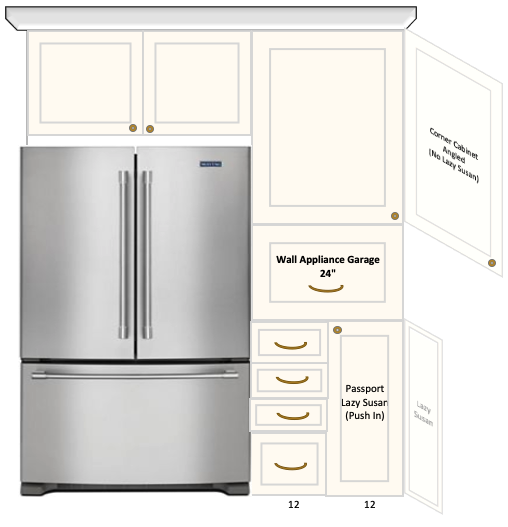
Listing out everything we own and wanted to store in the new kitchen was vital to make sure the new setup would function well for us. I wouldn’t skip this step if you’re planning your kitchen cabinet layout. 
Because we spent a lot of time discussing the function of each and every cabinet, we felt very confident handing things over to Joseph. We took these drawings back to him and he was able to input them into his system with the actual KraftMaid cabinets and we finalized it from there.
Adding Upgrades
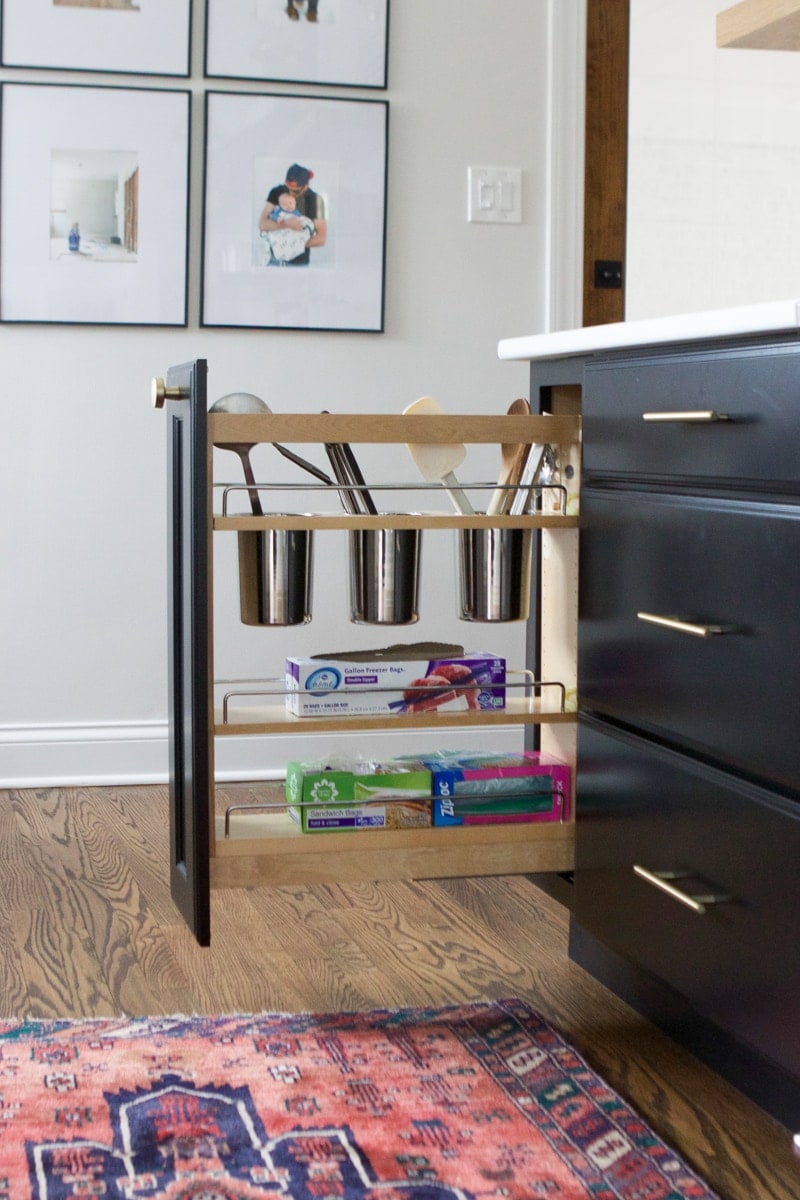
Utensil Pullout in Bridget’s Kitchen
You’ll notice in Finn’s drawings that we made notes on the areas where we wanted to do some upgrades with special inserts from the cabinetry company. We had so much fun (gosh, we sound lame…) figuring out which organizational upgrades we wanted. I swear we scoured the KraftMaid website for an entire Saturday night squealing over the thought of having a designated spice drawer or charging drawer! Here are a few things we incorporated into our new kitchen…
- Pull-out double trash can
- Corner lazy susan
- Charging station drawer
- Utensil pullout
- Hinged appliance garage
- Hood: We actually ordered the hood over the range directly from KraftMaid. It will be the same color and look as the cabinetry. I’m really excited about it!
- Leg detailing on the island
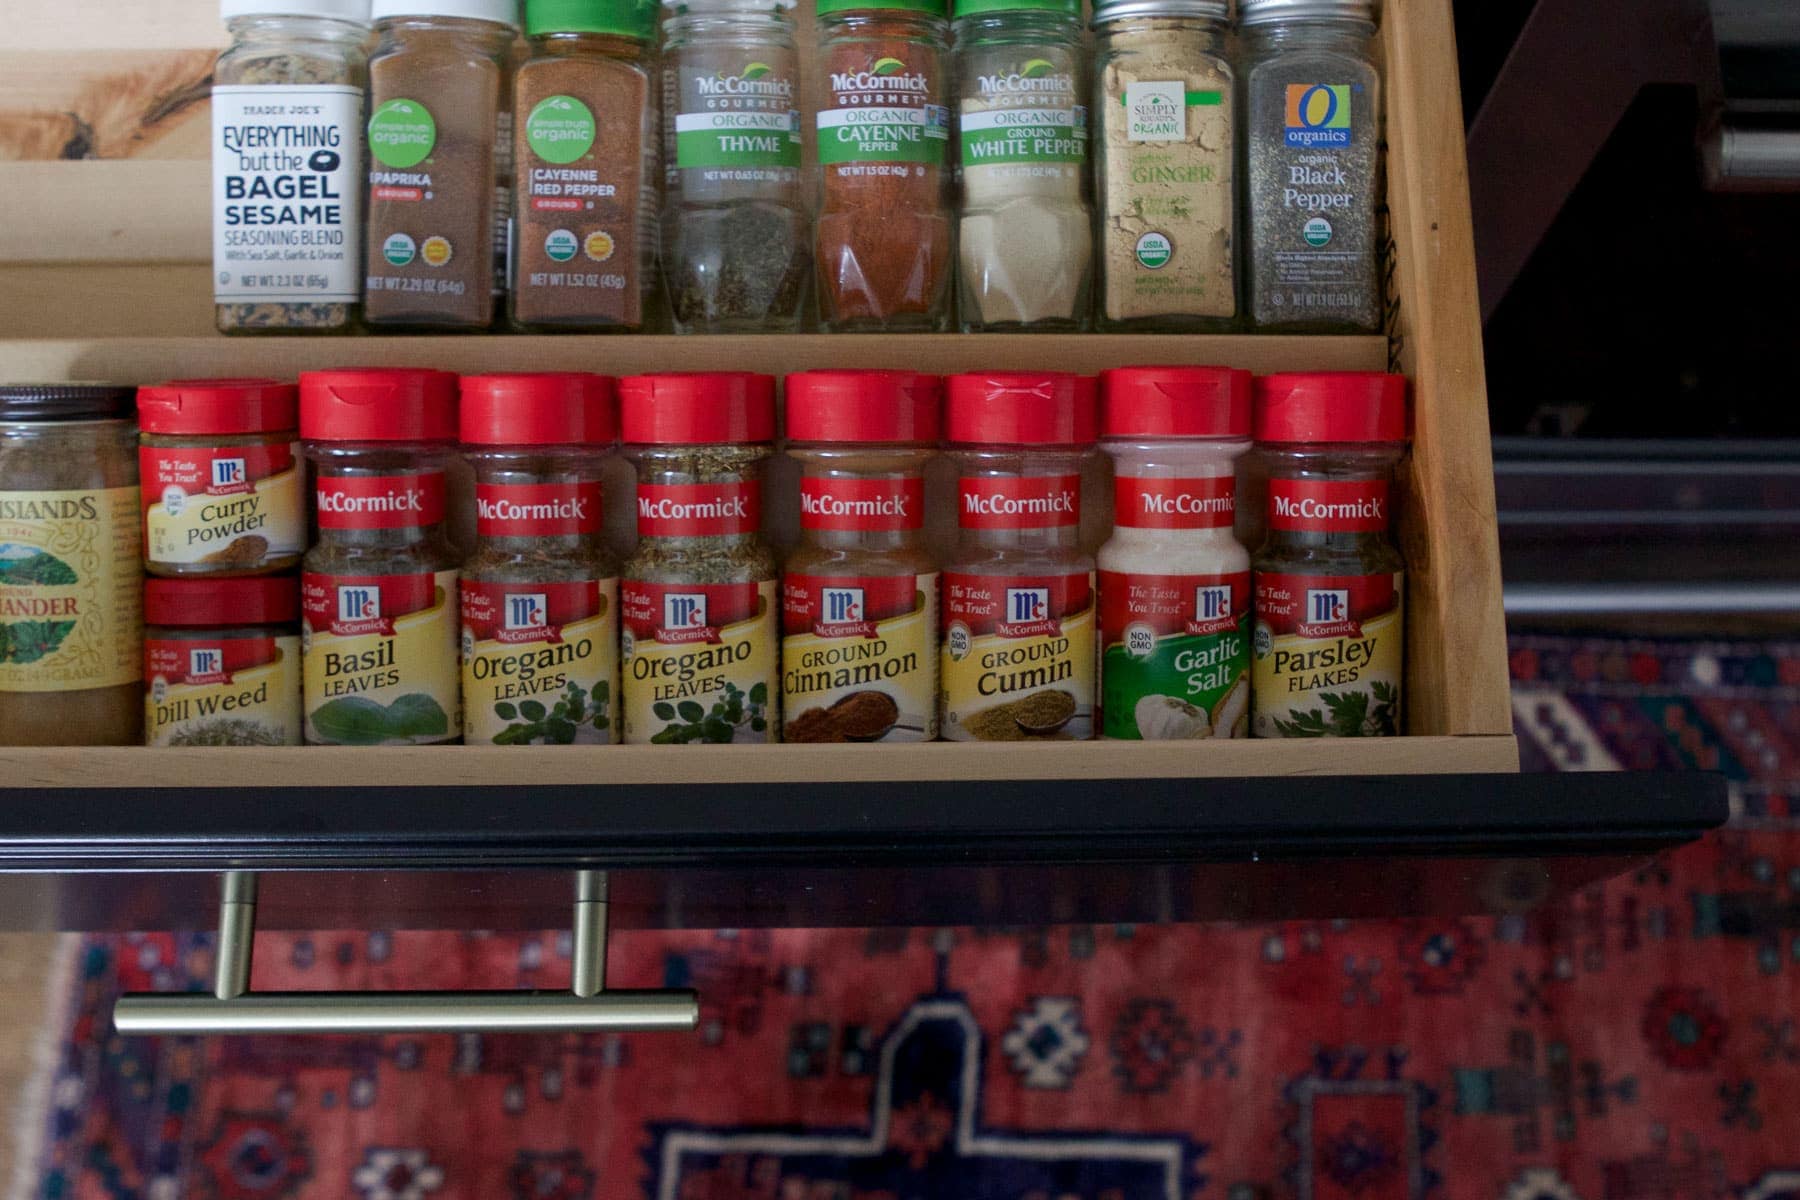
Spice Organizer in Bridget’s Kitchen
We’ll also add knife storage and spice drawer inserts to the drawers under the cutting board on the island. It’s going to be a dream and I am looking forward to the day when we can get this entire space completely organized!
The Finished Design


It’s gonna be magical!! We ordered our cabinets the second week of August and they should arrive by mid-September. It’s important to order your cabinets long before your kitchen project kicks off because it can often take 4-8 weeks to have them made and delivered. My contractor is a stickler for having everything on-site before he gets started, so we knew we had to get that order in!
Kitchen Cabinetry Costs
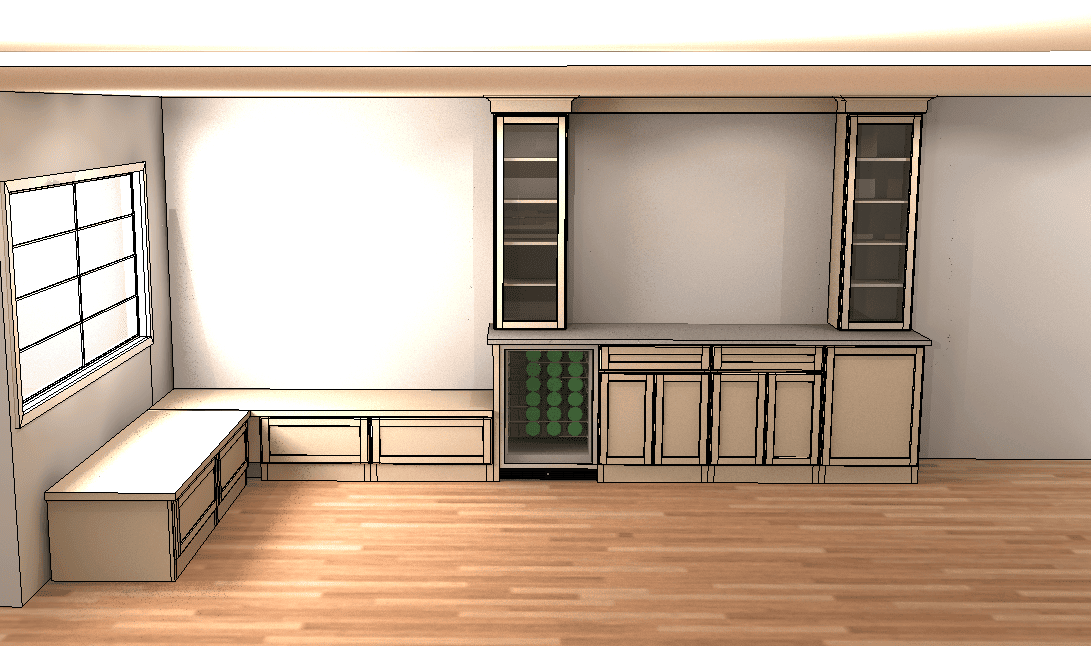
Okay, now what you’ve all been waiting for…the cost! Let me preface this by saying that the kitchen cabinets are typically the most expensive part of any kitchen. We knew this going in and saved accordingly. Not to mention, our kitchen is huge and we’re doing soooo much cabinetry with the large island, perimeter cabinets, dry bar area, and dining banquette. All in, we spent about $25,000 just on the cabinetry. (This does not include installation.) I think the regular retail cost would have been closer to $35-$40k, but we purchased during a big cabinetry sale and were able to get that number down!
It’s a serious chunk of change, but nice cabinetry lasts decades and comes at a cost! Cabinets are something you’ll be using and touching every single day, so it’s a good place to invest. The cabinetry in our current kitchen is almost thirty years old and it is in terrible condition. I’m confident this kitchen will last long after we’re out of this home.
What’s Next?
Figuring out the kitchen cabinet layout and ordering the cabinets was a big thing to check off my to-do list before we could start demo. Next week, I’ll share the other items that you’ll want to complete before you officially start your kitchen renovation and begin demo. Then, it will be time to get this old kitchen outta here and start building it back up…
Casey
Catch Up On Our Kitchen Renovation
- Kitchen Before Photos
- Hiring a Designer
- Our New Kitchen Layout
- Design Plan & Mood Board
- Single vs Double Bowl Sink
- Ordering Our Kitchen Cabinets
- Tasks To Do Before a Kitchen Renovation
- Our Old Kitchen Is Out
- Creating Our Electrical Plan
- Our Kitchen Cabinets Are In!
- Kitchen Hardware Guide
- Dining Nook Design Plan
- Choosing Quartz Countertops
- Painting the Kitchen
- Our Dining Room Nook
- Finding a Kitchen Runner
- Our New Lighting
- Our Wood Butcher Block
- The Kitchen Renovation Timeline
- The Big Kitchen Reveal
- What I Learned from Our Kitchen Renovation
- Kitchen Before & After Video
- Our Kitchen Appliances
- Renovation Budget & Cost


